

+ View and manipulate shaders on the fly with the Raspberry PI
Summary
SLIMSHADER is an Open Source Raspberry PI(a) project based on glslViewer(b) and capable of displaying plain images and OpenGL/GLSL shader files.
Shaders are small programs that leverage the power of the GPU to display modern graphics simulations. Visit www.glslsandbox.com to view shaders created by hundreds of artists(c).
SLIMSHADER can display these shaders(d) and modulate them by means of;
▪ Audio
▪ MIDI
▪ Manually tweaking dials
▪ Built-in LFOs (Low frequency Oscillators)
▪ Control Voltage (0 to 5V or 0 to 1V)
SLIMSHADER is a Eurorack format design with HDMI and Analog video output for people who like to add visuals to their music, for video-synth enthusiasts or anyone looking to learn and play with shaders files.
(a) Tested with the Raspberry PI Zero W, Zero 2 W and 3b (v1.2).
(b) Patricio Gonzalez Vivo & Jen Lowe, authors of The book of shaders.
(c) Please note that the SLIMSHADER Raspberry PI image file comes with hundreds of shader files. Credits go out to all the makers of these shaders; their names can often be found in the header of the shader file itself.
(d) Complicated shaders typically require much more CPU/GPU power and a Raspberry PI is not always able to deliver unfortunately - please keep that in mind.
 The Slimshader Module on GitHub
Fancy building the Slimshader Module yourself? - then please visit the Slimshader GitHub project page.
 The Slimshader Raspberry PI image
Download the latest Slimshader Raspberr PI image file from Google Drive.
You'll need a 16GB Micro SD card (or better 32GB as some 16GB SD cards are actually less than 15GB and the image won't fit).
Specs
- 3U/28HP = approx. H129mm x W142mm
- Depth approx. 45mm
- +12V = 250mA, -12V = 80mA, +5V = 0mA
- MIDI Type A and/or B (Hardware Jumpers configured)
- Supports audio modules Control Voltage (0-5V) and "LZX standard" (0-1V)
- HDMI and Analog Video (PAL or NTSC) output
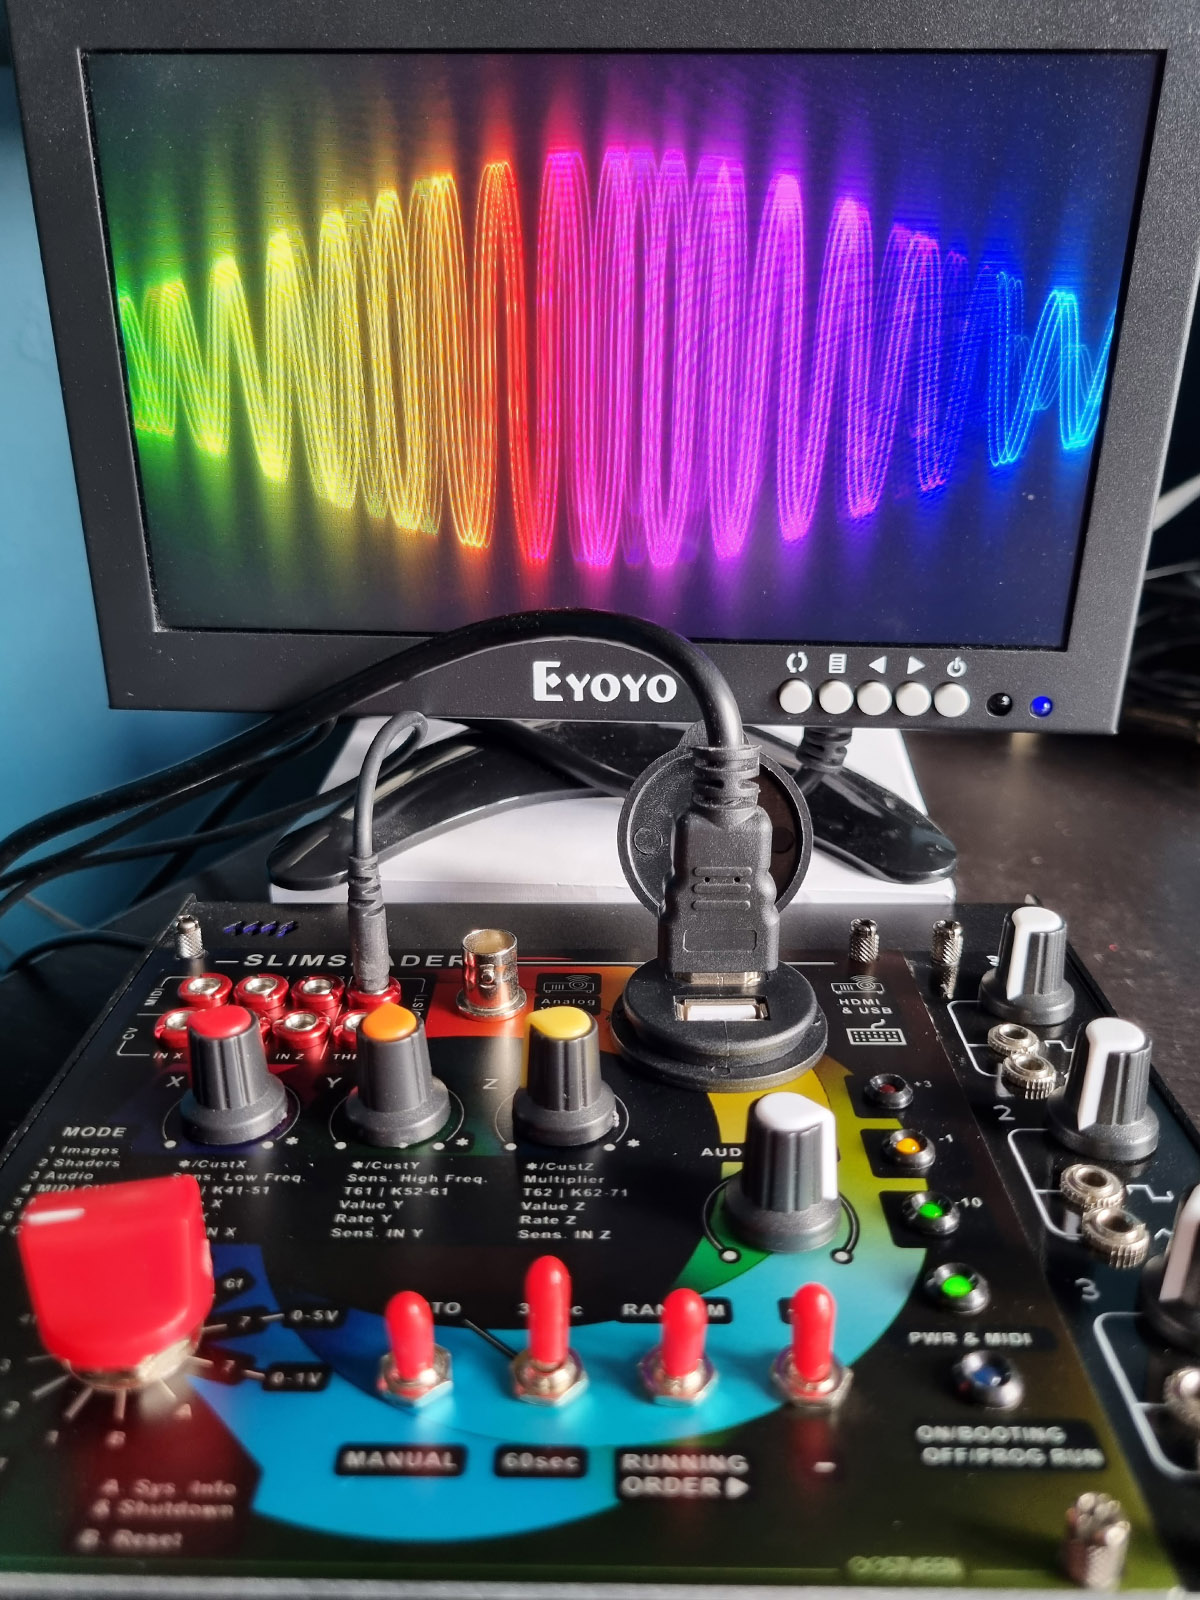
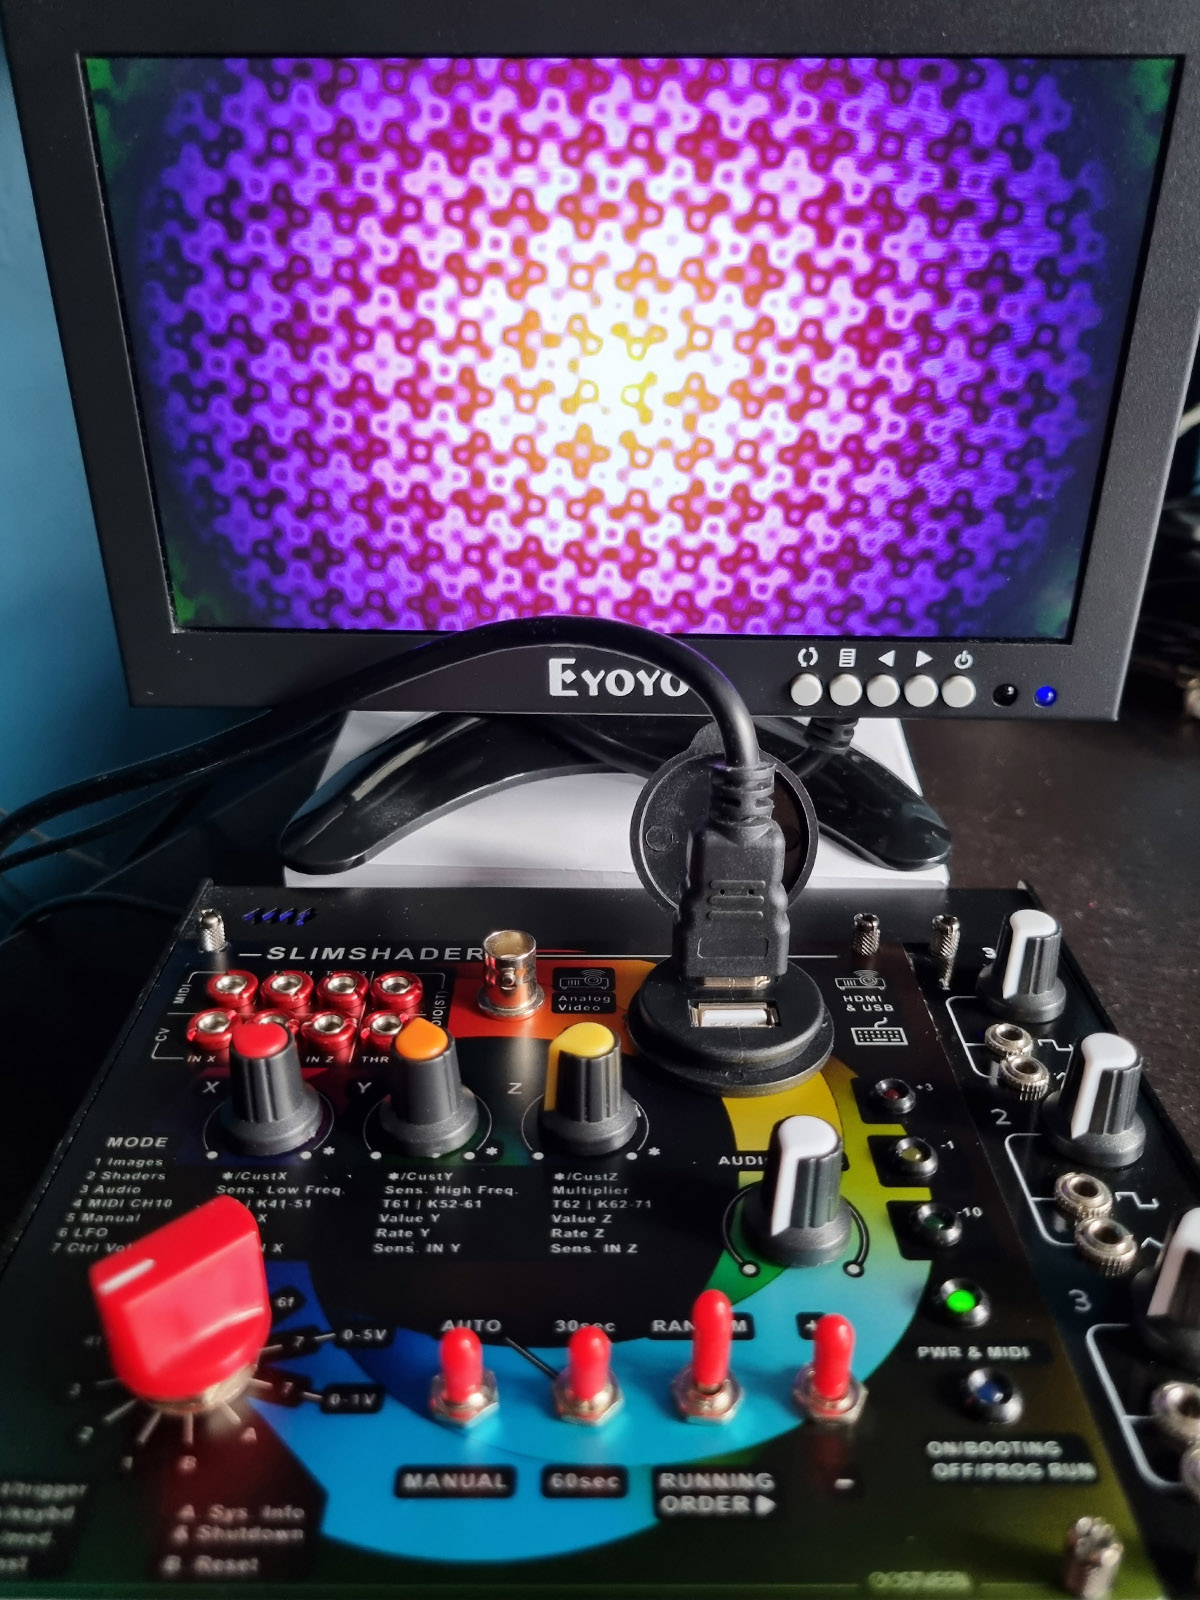
Demos
The background visuals in the playlist below are all generated with the help of the Slimshader module.
User Guide
Index
- Front Panel
- Mode Switch
- Using the Module
- Logon
- Navigating Slimshader
- Adding a new shader for manual modulation (Mode 5)
- Wrapping it up
- MIDI Jumper Settings
- Quick user guide
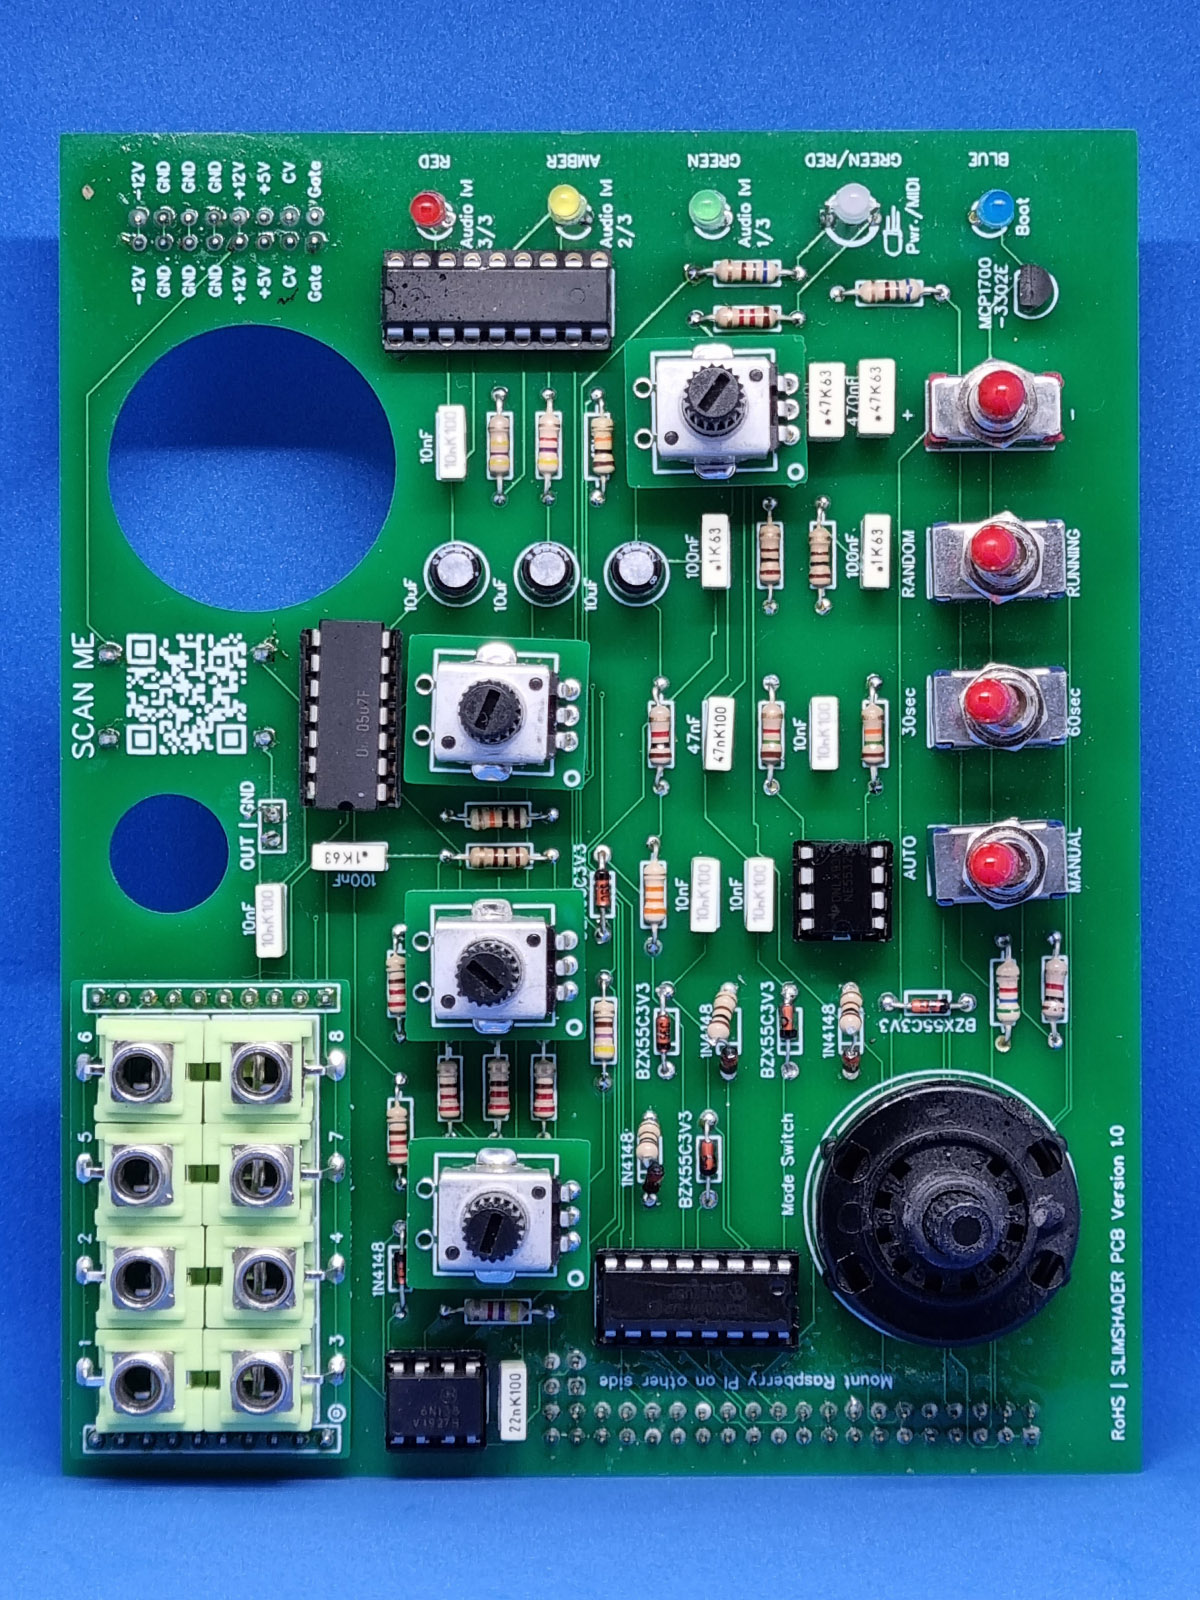
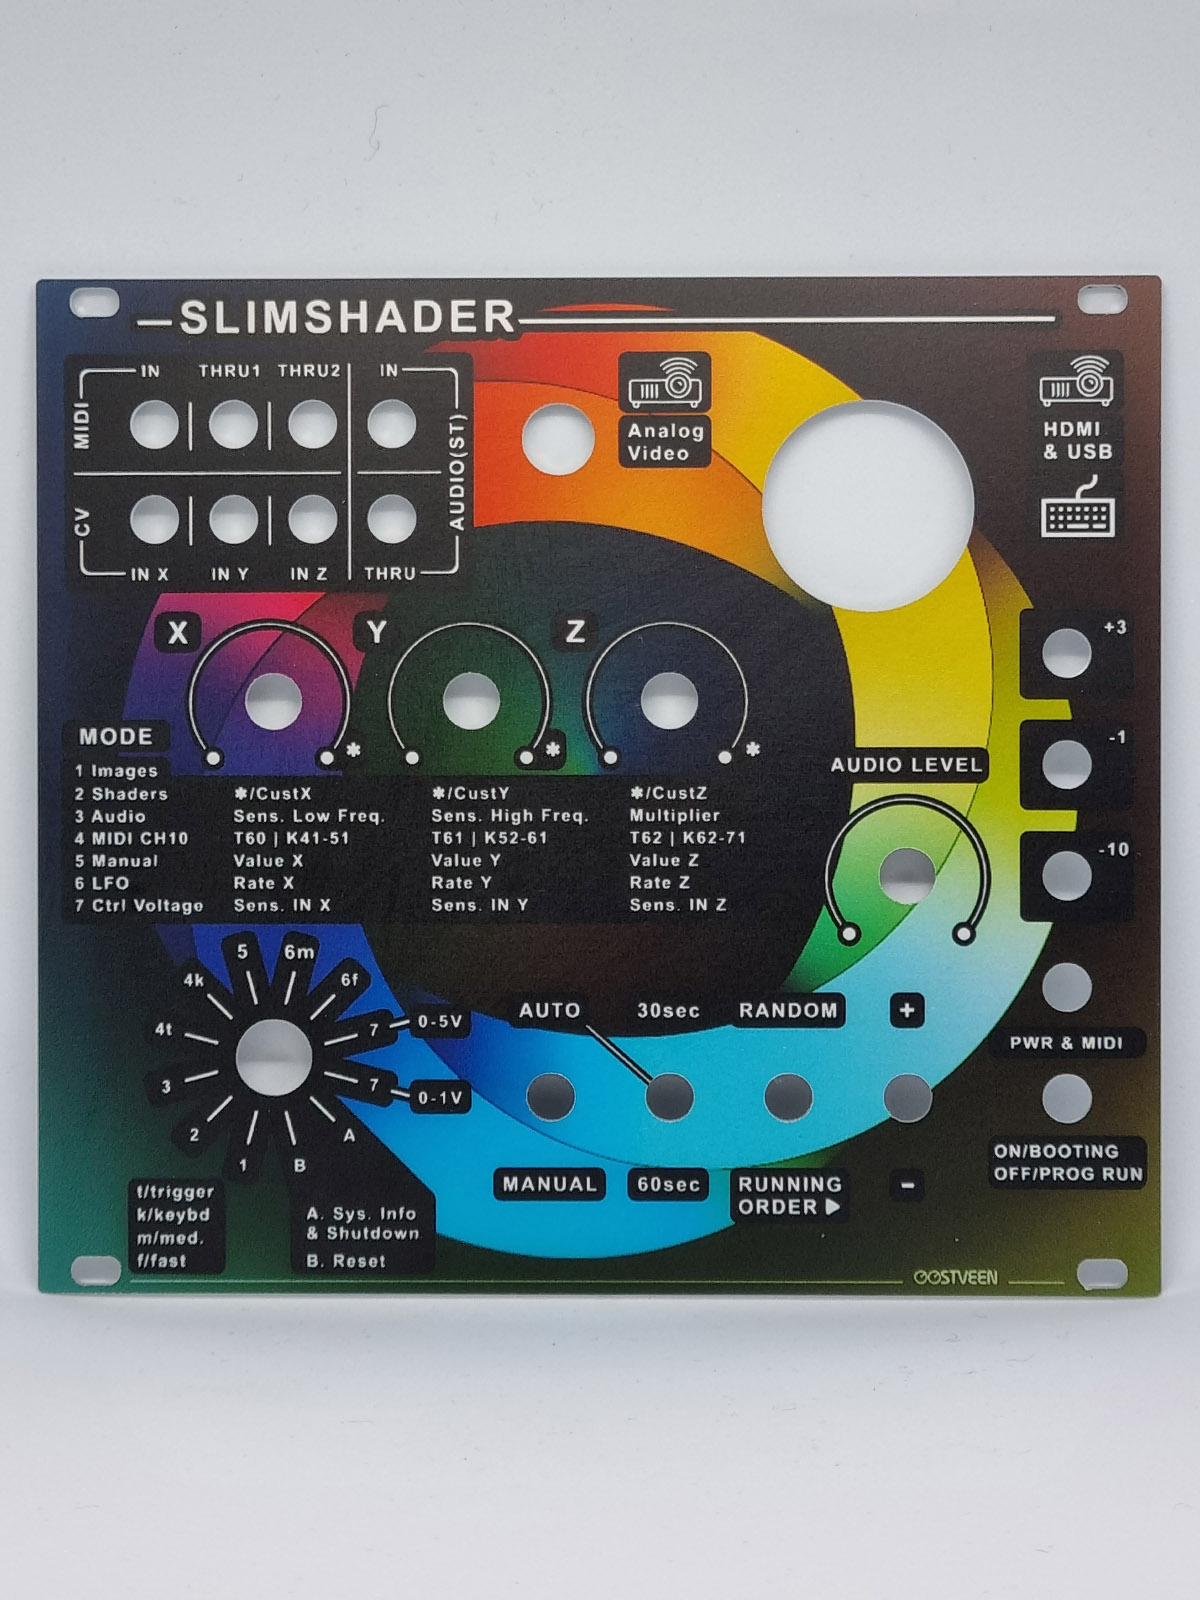
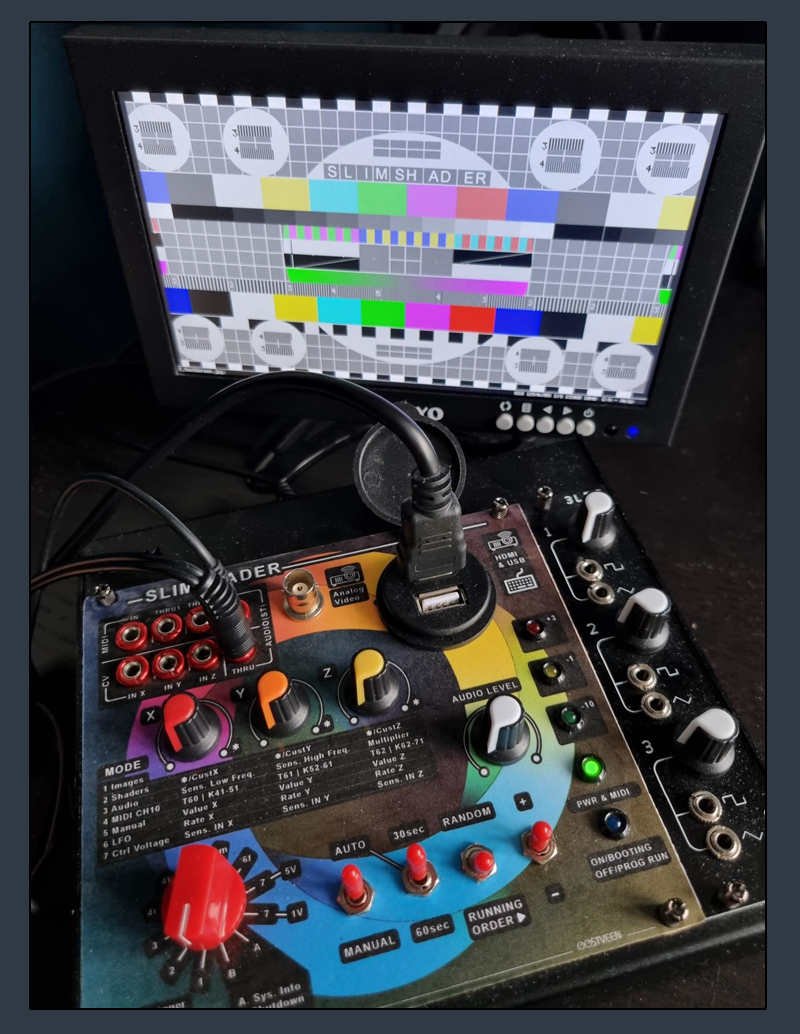
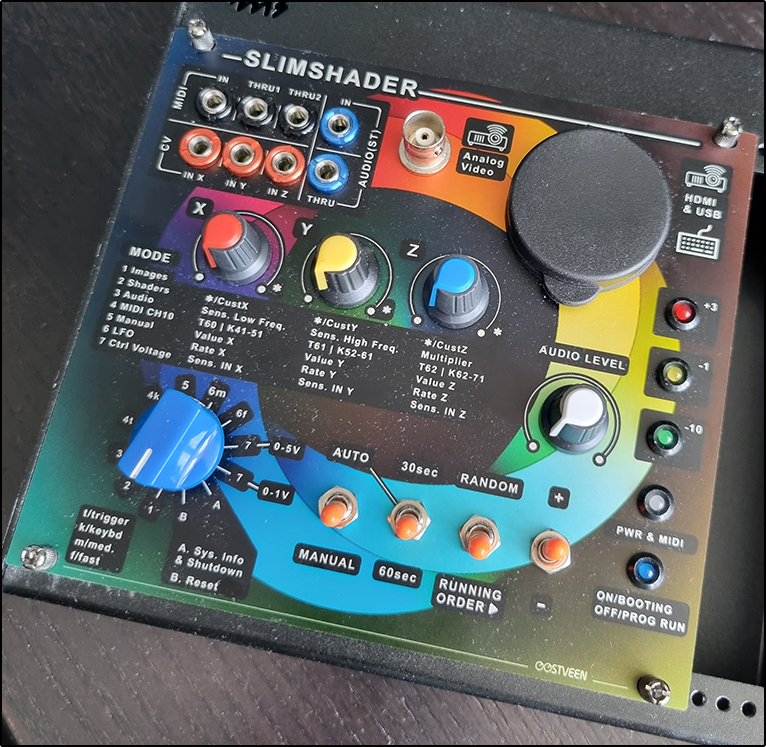
Front Panel
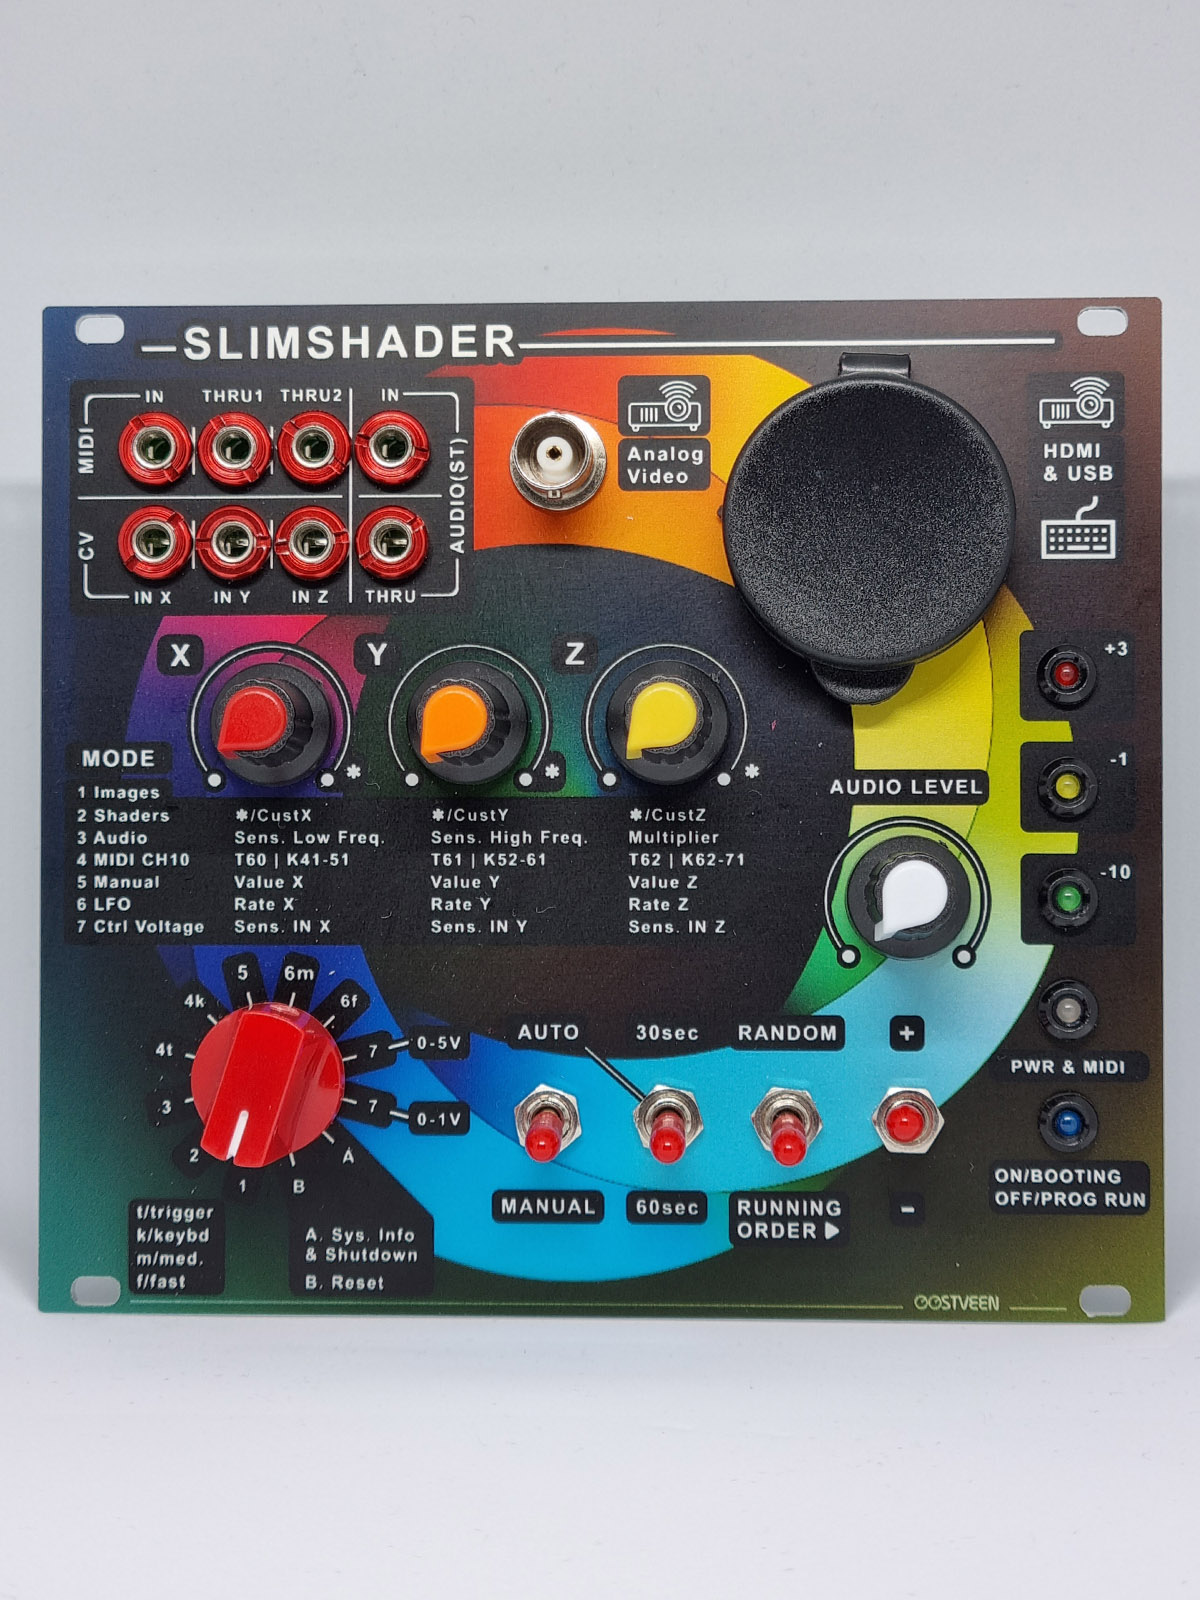
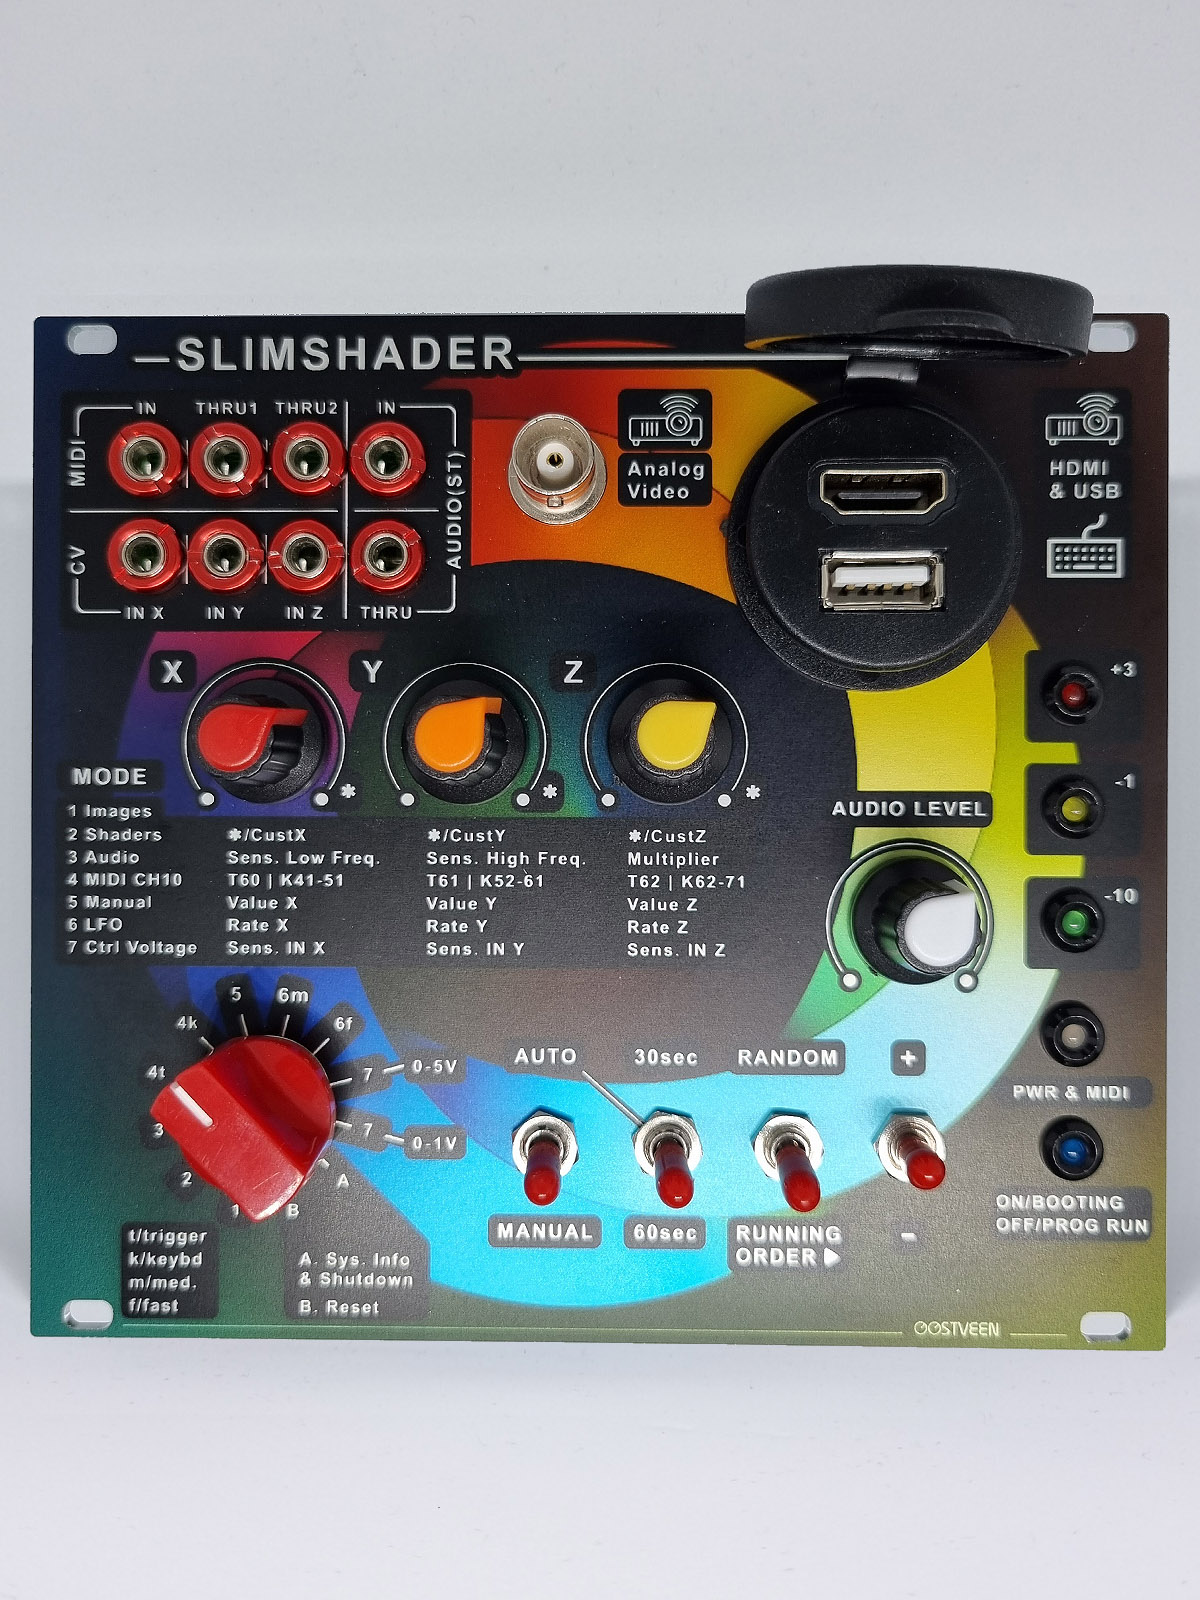
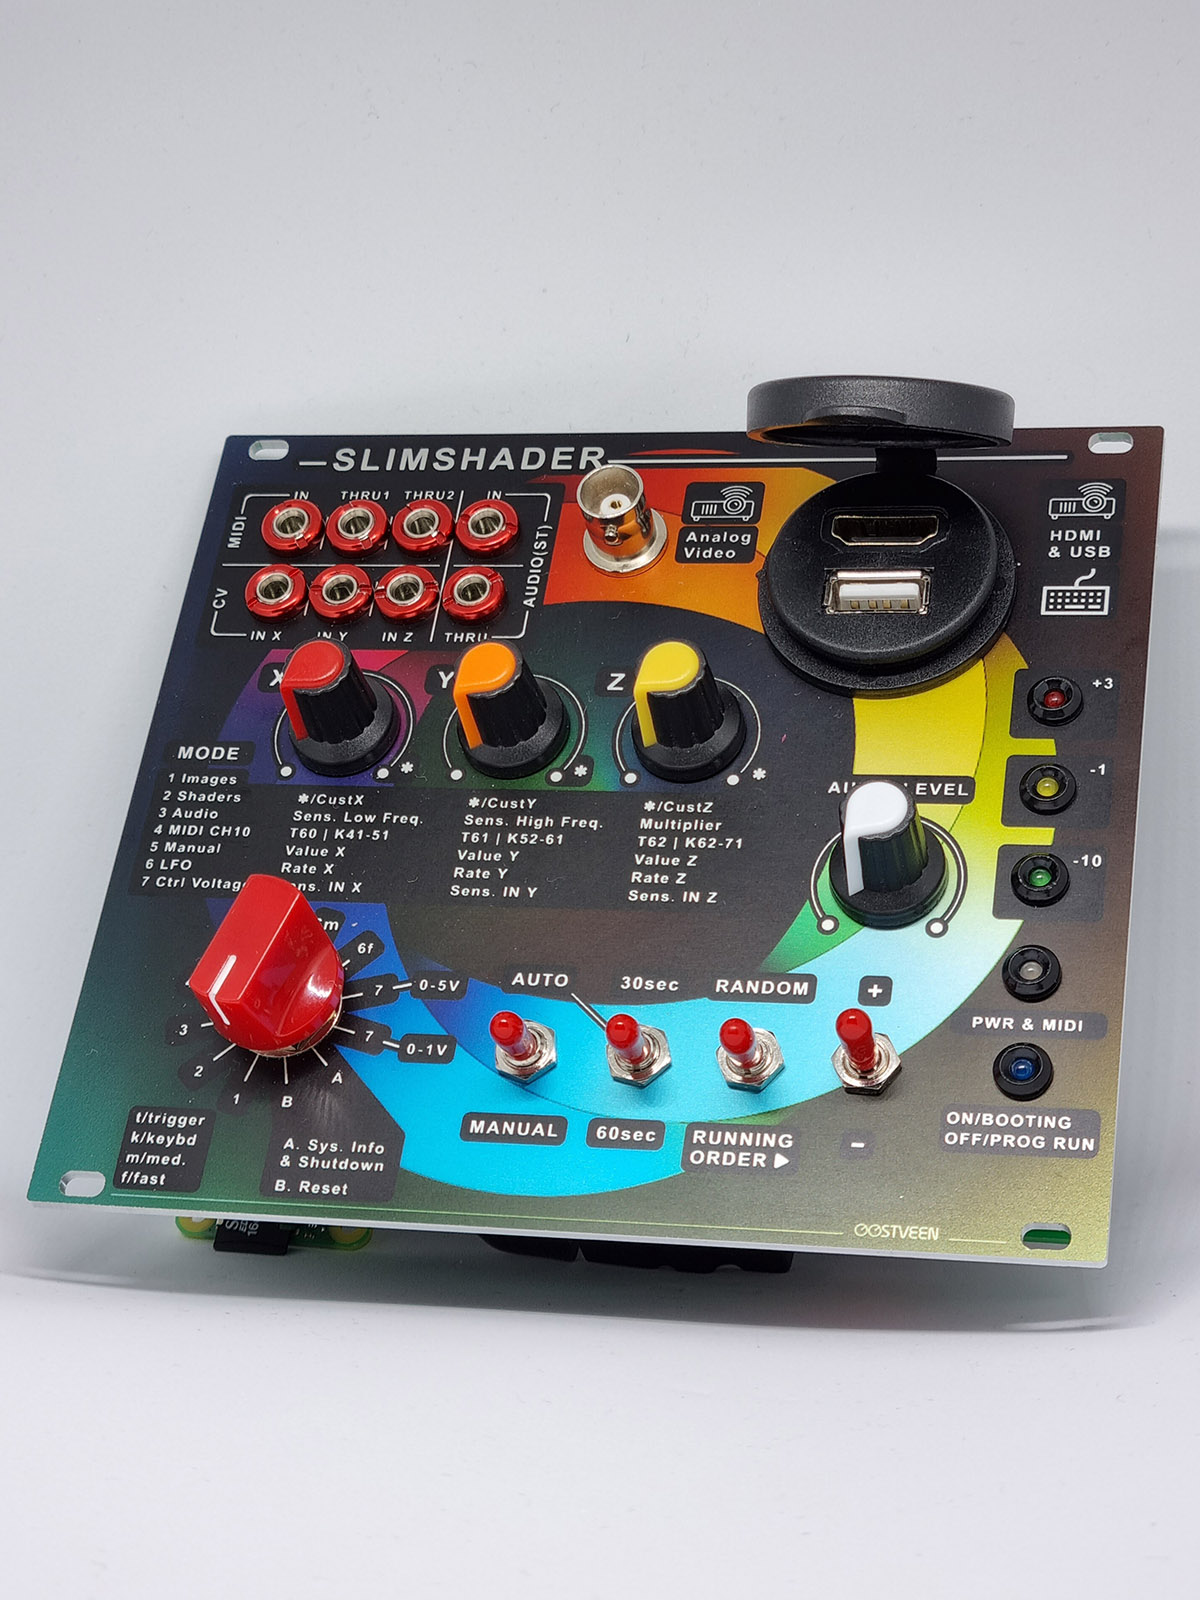
The image below is showing the SLIMSHADER's front panel.
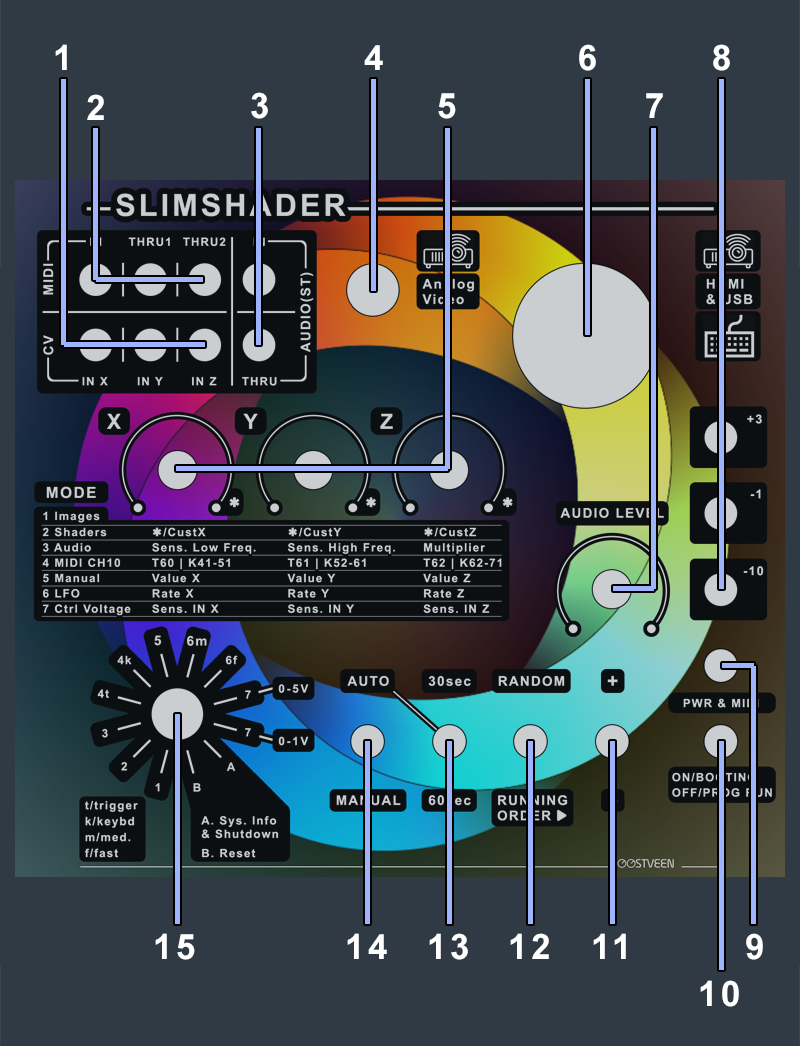
- 3 x CV IN (Labelled: IN X, IN Y, IN Z)
In Control Voltage mode, the three CV inputs can control a shader uniform each. A uniform is a global shader variable declared with the "uniform" storage qualifier. The Slimshader module will work its wonders without the need to understand uniforms; uniforms only become relevant whenever you want to add or modify existing shaders. - MIDI IN + 2 x MIDI Thru
In MIDI mode, MIDI notes can control shader uniforms in either Trigger- (switch position 4t) or Keyboard- (switch position 4k) sub-mode. Note that in MIDI mode, the Slimshader module "listens" to MIDI notes on channel 10 only.
▪ TRIGGER: In Trigger sub-mode, MIDI note numbers 60 (C3 or C4*), 61 (C3# or C4#*) and 62 (D3 or D4*) each can trigger a uniform to run from 1.0 to 0.0. The release -how fast it goes from 1.0 to 0.0- can be adjusted by tweaking the X, Y and Z dials.
▪ KEYBOARD: In Keyboard sub-mode, MIDI note numbers 41 to 51, 52 to 61 and 62 to 71 determine the value of a uniform each. These uniform values are always 0.0 for note numbers 41, 52 and 62 - and 1.0 for note numbers 51, 61 and 71 but only when each dial is set to max; so, the dials allow for levelling-off the values assigned to the incoming midi notes. A dial set to minimum results in the relevant uniform to remain 0.0 and when positioned in the middle, the max value of the relevant uniform can never be more than 0.5.
*Depending on the manufacturer of your gear. - Audio IN & Thru
The Audio IN socket accepts mono and stereo signal sources. The audio THRU socket simply passes on the source signal regardless of the position of the Audio Level dial. The Audio Level dial indicates the signal strength going into the Slimshader's circuitry. For best performance make sure that the signal level only occasionally reaches the Red "+3" LED. In Audio mode, the X Dial determines how much the lower frequencies (Bass and such) influences the value of the X-uniform (from 0.0 for soft low frequencies to 1.0 for loud low frequencies). The Y Dial determines how much the higher frequencies (Voices and such) influences the value of the Y-uniform (from 0.0 for soft higher frequencies to 1.0 for loud higher frequencies). The Z Dial multiplies both the X- and Y- uniforms to achieve extreme visuals; it's a sort of visual overdrive dial. - Analog Video Out (PAL - or NTSC)
The Analog Video output, outputs PAL. You may have to hard-reset the Slimshader module by briefly going to the main switch's "B" position to force a change in video output (from HDMI). Note that the Slimshader is capable of operating in NTSC mode too by making a change to one of the Raspberry PI configuration files. - X, Y, Z Control
Dials X, Y and Z have a different functions depending on the selected mode. The dials have no functionality in modes 1, A and B. - HDMI Output & USB Connectivity
The default Slimshader output is HDMI. Use either the BNC connector (PAL) or the HDMI socket - not both at the same time. You may have to hard-reset the Slimshader module by briefly going to the main switch's "B" position to force a change in video output (from PAL). The USB connector is there for connecting peripheral devices (keyboard, mouse, memory stick etc.). - Set Audio Input Level
After connecting a stereo or mono audio line source to Audio IN, use the Audio Level dial to dial-in a nice signal-level for the Slimshader module to work with. Typically, levels between the Amber "-1" LED and Red "+3" LED are ideal. - Incoming Signal Level Indicator
As described in "Set Audio Input Level", levels between the Amber "-1" LED and Red "+3" LED are ideal for the Slimshader module to work with as this makes sure that the relevant uniforms vary between 0.0 and 1.0. - Power & MIDI Indicator
This is a bi-colour LED and will light Green to indicate the module receives power. In MIDI mode (switch positions 4t and 4k) this LED will blink RED to indicate it receives the note numbers described in "MIDI IN + 2 x MIDI Thru". The Slimshader module uses MIDI channel 10 only. - Module Boot & Run Indicator
When the Slimshader is powered-up, this LED will light Blue and switches off as soon as the main program is executed. If the Blue LED lights up again, the module is either rebooting or there's some other issue preventing the module from operating properly - in that case you can always hard-reset the Slimshader module by briefly going to the main switch's "B" position. This typically sorts out any issues. - Manual Shader Selection: Up (+) & Down (-)
Use this switch to either go up or down the stored images and shader files. The order is determined by the switch described next. - Shader Selection: Random or in Running Order
With this switch in the Random position, the Slimshader module will select random images or shaders. Note that in this position both + & - trigger a new random image or shader*. In the Running Order position, the Slimshader module will select images and shaders in alphabetical order (i.e. by the filename given to an image file or shader file).
*Note that in random mode, the Slimshader module will run, at random, through all shaders before refreshing the shaders pool - or, in other words, with 400+ shaders -in mode 2- and the switching timer set to 60 seconds, it will take over 6 hours before you see the same shader again! - Shader Switch Timer (Automatic Mode Only)
This switch works in conjunction with the switch described next. In auto mode, this switch determines when the next image or shader is shown - so, either every 30 or 60 seconds. The next image or shader to appear on screen depends on the setting of the Random/Running-Order switch. - Shader Switch: Automatic or Manually
In Auto mode the Slimshader module automatically switches from image to image or from shader to shader (in any of the 7 modes). In manual mode switching is done with the +/- switch. In auto mode, the +/- switch can be used to override the 30/60 seconds timer and switch to another image or shader (and resetting the timer at the same time). - (main) Mode Switch
See the dedicated "Mode Switch" section below.
Mode Switch
The Mode Switch allows for the Slimshader module to operate in 7 different settings. There's Images, (just) Shaders, Audio, MIDI, Manual, LFO and Control Voltage.
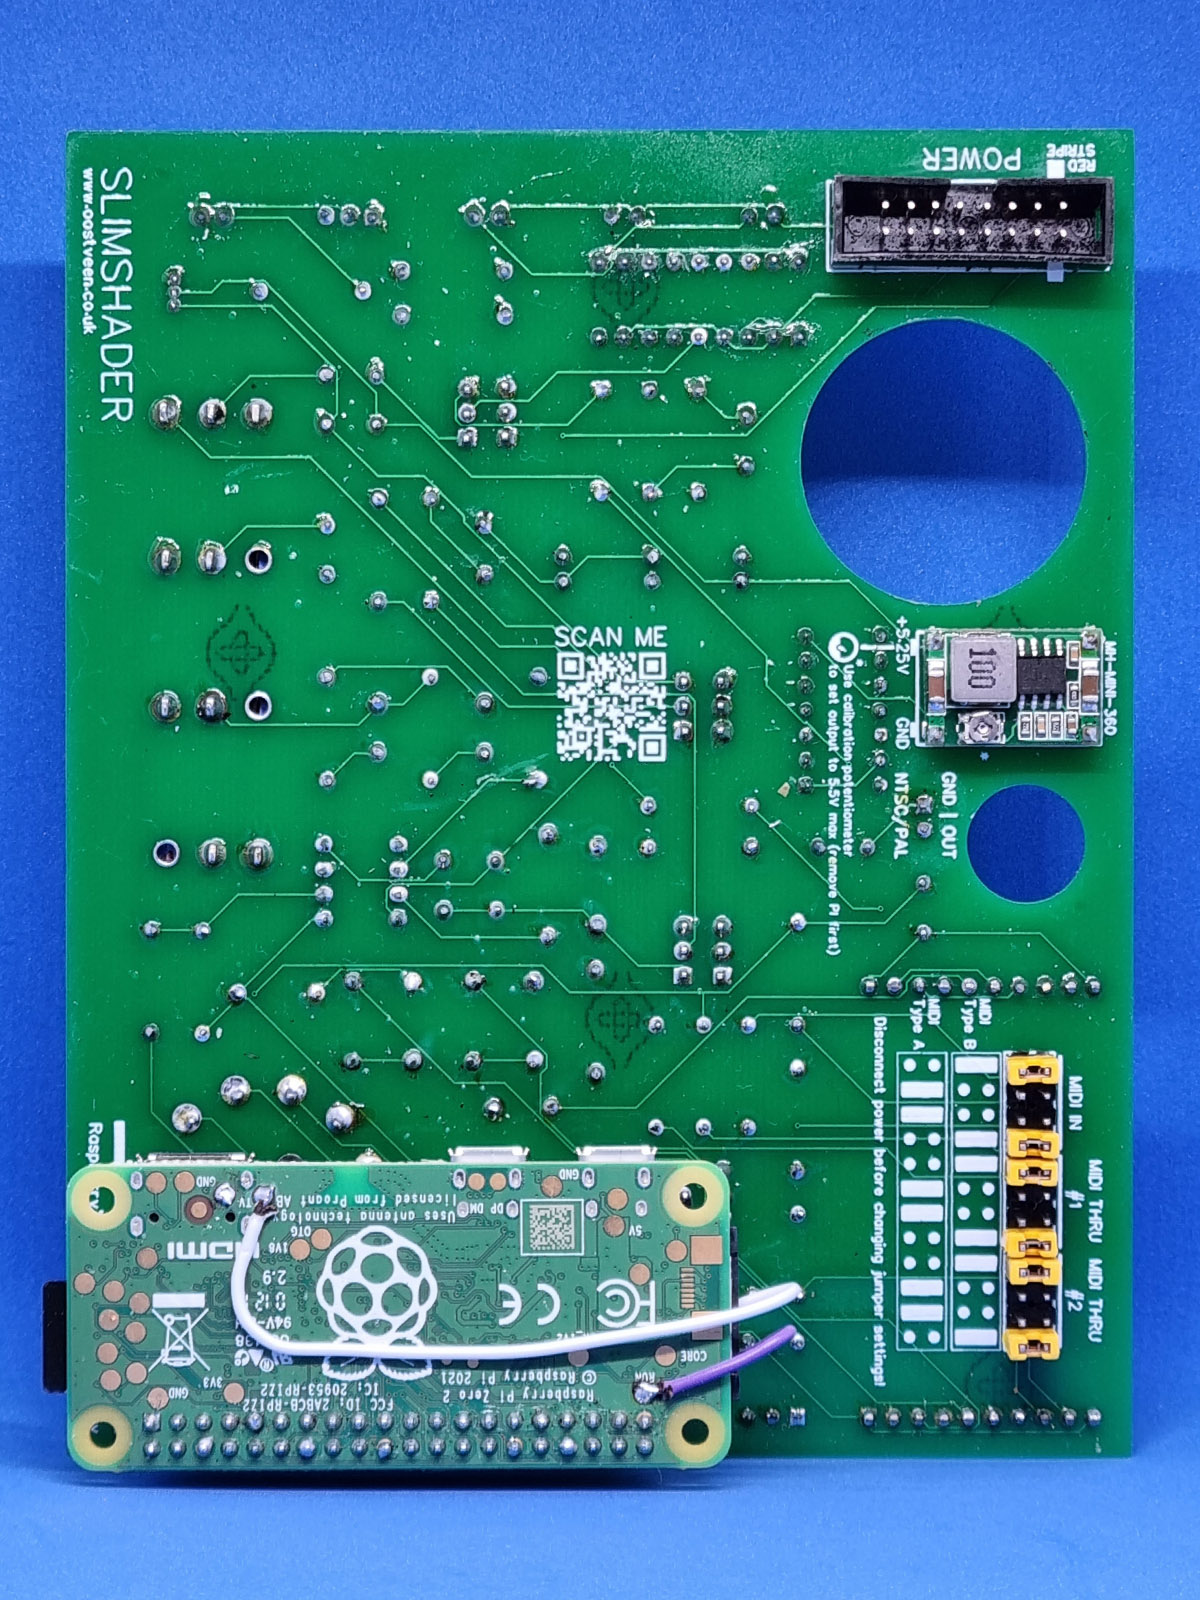
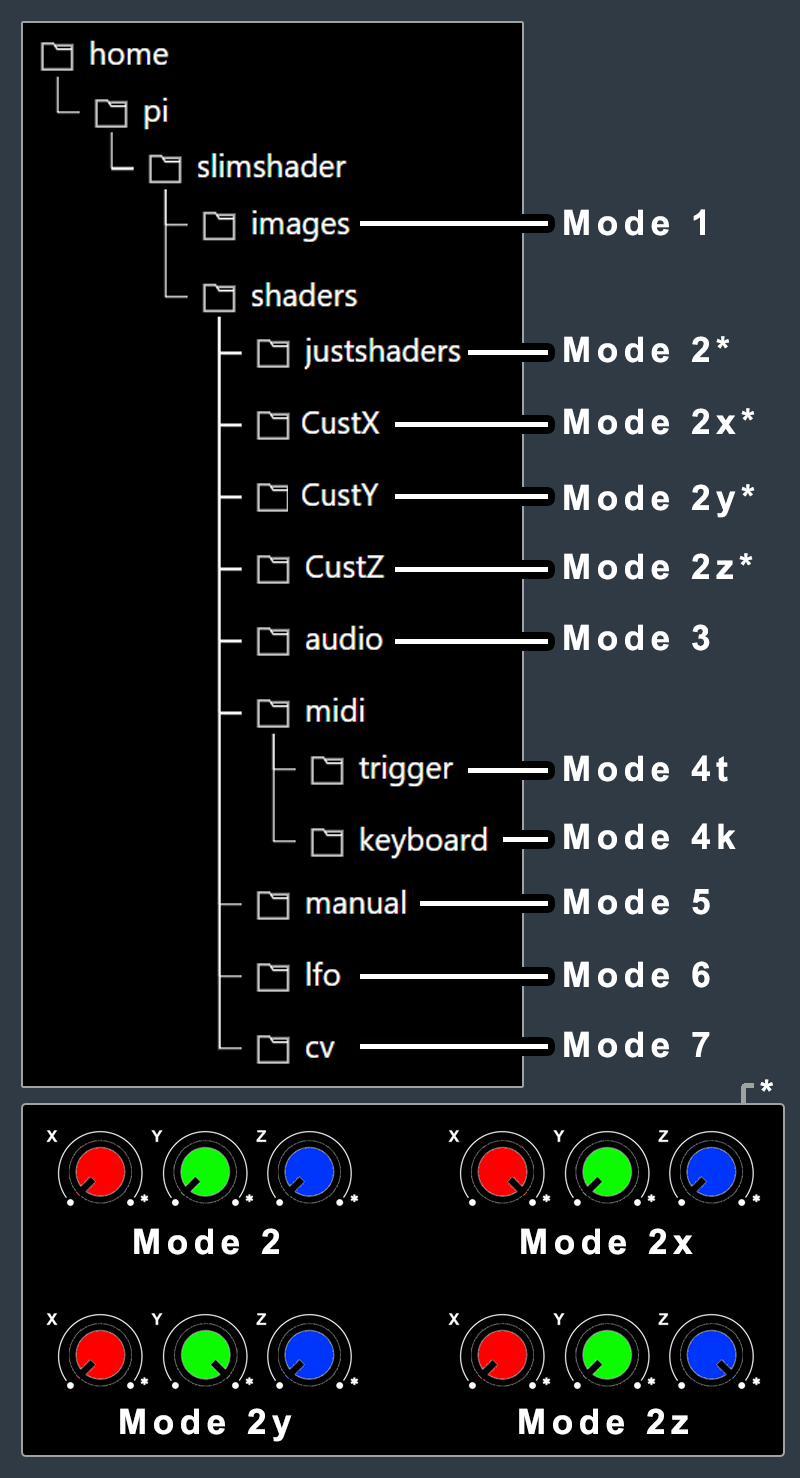
Before going through each mode, please have a look at the Raspberry PI's directory structure of the Slimshader module. The directories shown below are locations where you can find the images and shaders used for each of the 7 modes.
Note: here you can download the fulll zipped slimshader directory structure (3mb) if you want to have a look at the slimshader.py main program and all shaders files etc. without having to download the full 16GB image file.
The Mode 1 images directory contains .jpg image files. The directories for Modes 2 to 7 all contain .frag files - or so called Fragment Shader files.
Note that in order to select shaders from the CustX, CustY and CustZ directories, refer to the setting of the X, Y and Z Control-dials. Any combination of the control-dials not shown here, results in shaders shown from the justshaders directory.
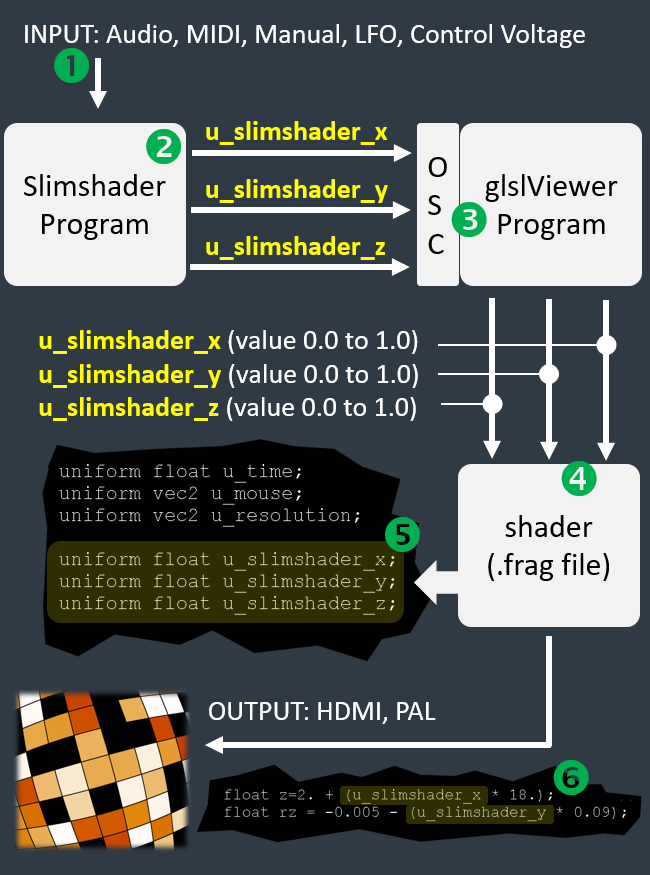
On final thing; it's helpful to have some understanding as to how shader files are controlled from "the outside" (i.e. Audio, MIDI etc.). In the diagram below
(1) "outside" measures and protocols such as MIDI are translated, by the
(2) Slimshader Python program to up to three variables called
u_slimshader_x
u_slimshader_y
u_slimshader_z
The values of these variables are between 0.0 and 1.0 (between 0.000000 and 1.000000 to be precise).
(3) The variables are passed on via OSC to the glslViewer OpenGL application. glslViewer is the program that takes a .frag shader file and displays it on screen.
(4) In doing so, glslViewer passes the variables on from the Slimshader program to the shader file itself.
(5) Inside the shader file, which is just a plain editable text file, these passed-on variables are called "Uniforms". In order for the shader to "understand" these incoming 0.0 to 1.0 values, we define them as uniforms (i.e. "uniform float u_slimshader_x;" etc.).
(6) we can now add these uniforms throughout the shader file code and influence/control/modulate various aspects of what the shader file is showing on screen like motion, colour, size, brightness etc. - the sky is the limit!
Ok, now lets look at the Mode switch
- Mode 1: Images
In Images mode the Slimshader module displays stored .jpg images from the images directory. The X, Y and Z dials have no function but the four toggle switches will operate. - Mode 2: Shaders
In Shaders mode the Slimshader module simply displays stored shader files (no uniforms are passed-on). You can store shader files in four directories and use the three X, Y, Z dials to select the active directory. The "justshaders" directory contains hundreds of shaders of all kinds. The "CustX", "CustY" and "CustZ" directories can be populated with specific shaders; by default "CustX" contains slow moving shaders. "CustY" contains still shaders. "CustZ" contains (my) favourite shaders. It's entirely up to you how you want to (re)populate these directories. - Mode 3: Audio
In Audio mode the Slimshader module uses incoming Audio to modulate shader files. Control X determines how much of the lower frequencies modulate the shader file (u_slimshader_x) and Dial Y determines how much of the higher frequencies modulate the shader file (u_slimshader_y). The Z dial multiplies the uniforms assigned to dails X and Y to achieve "over the top" visual effects. - Mode 4t & Mode 4k (MIDI CH10)
In MIDI mode the Slimshader accepts MIDI notes send over MIDI channel 10. There are two MIDI modes:
TRIGGER (4t): See image below. In this mode, MIDI notes 60, 61 & 62 can trigger for a uniform (u_slimshader_x, u_slimshader_y and u_slimshader_z) to countdown from 1.0 to 0.0. The speed of countdown -or release- is set by the control-dials X, Y and Z. Release is initiated on note on; note off is ignored.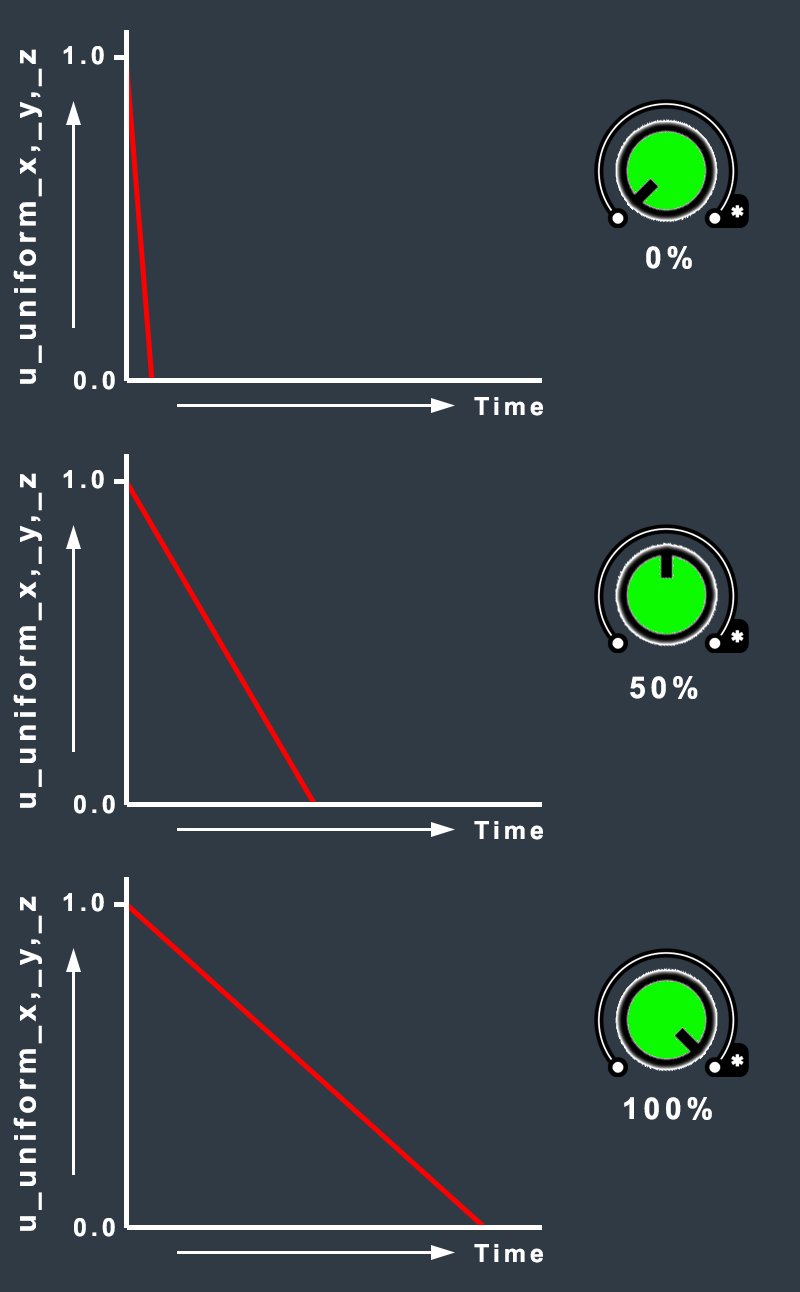
KEYBOARD (4k): See image below. In this mode, the value of a MIDI note determines the value of a uniform (u_slimshader_x, u_slimshader_y and u_slimshader_z). The relative value of each uniform can be adjusted by means of the three control dials. Set dial to 100% each for full 0.0 to 1.0 range. A value is set on note on; note off is ignored.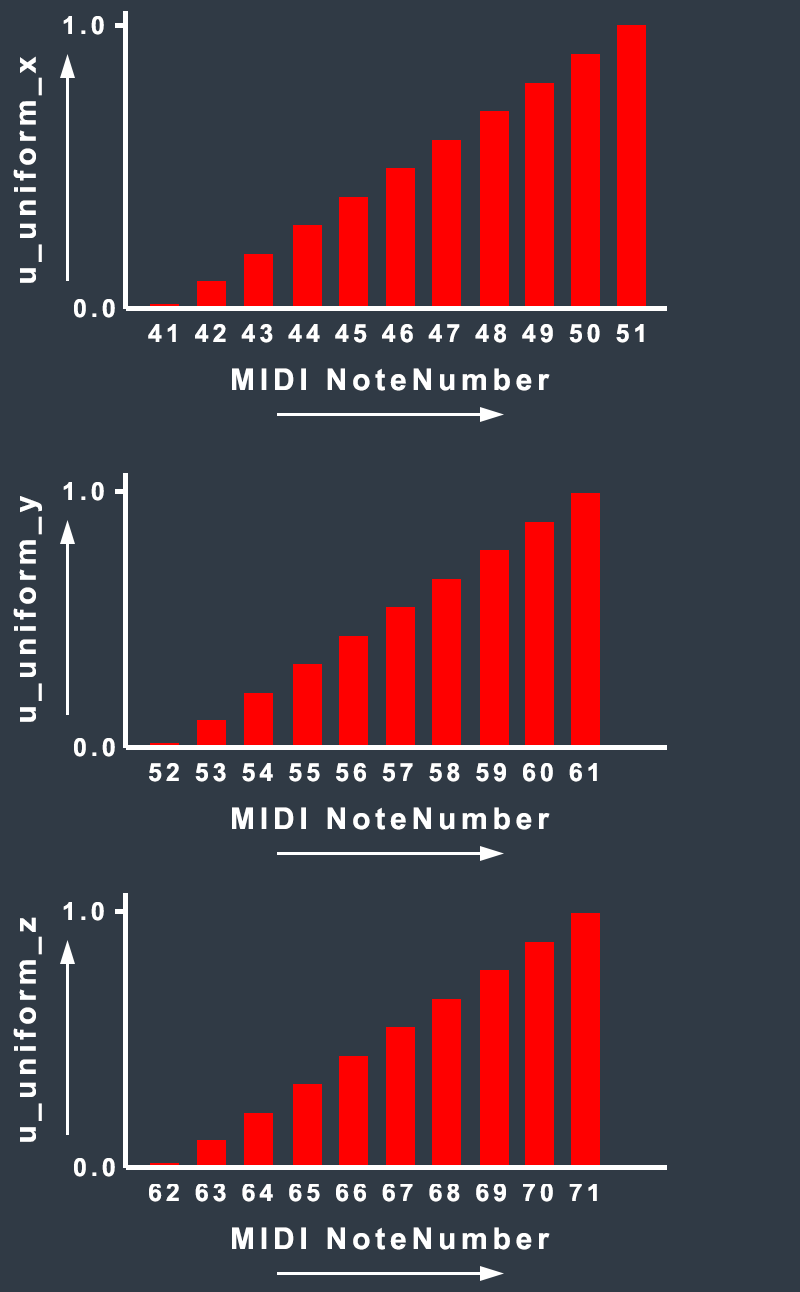
- Mode 5: Manual
In this mode, each of the three uniforms can be set between 0.0 to 1.0 by turning the dials manually. Note that on the initial turn of a dial, the relevant uniform's value may jump from a previous much lower or higher value and this might show on screen as an abrupt change - from there changes will look gradual.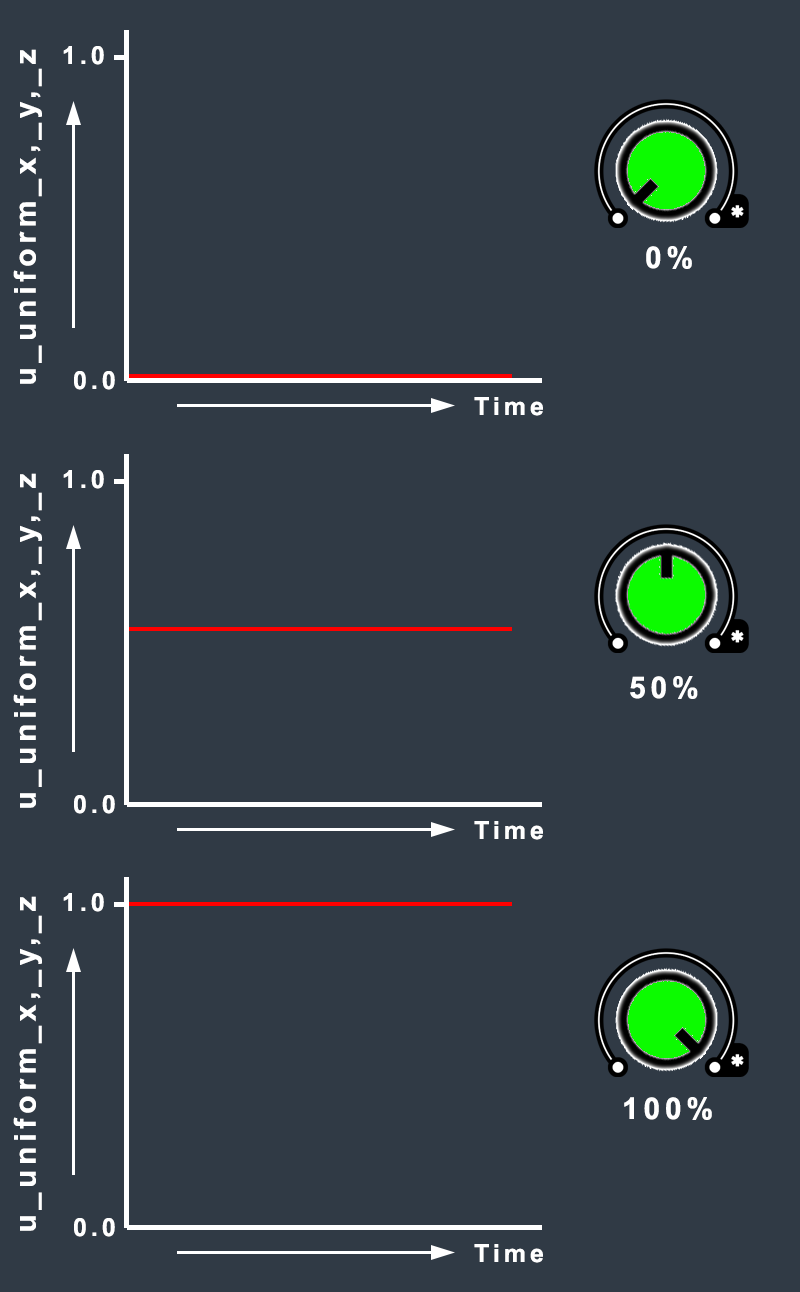
- Mode 6: LFO
In this mode, the value of each of the three uniforms are controlled by three independent Low Frequency Oscillators (LFOs). There are two LFO modes: Medium Range (6m) and Fast Range (6f). Simply put; in Medium Range the LFOs don't modulate/change the uniforms as fast as in Fast Range. Most shaders are of a repetitive nature, by adding (Slimshader) uniforms, a shader looks different over a much longer time depending on the set speeds of the LFOs. Note that in Medium Range, the uniform changes are more gradual than in Fast Range. In case you were wondering; the LFOs are software based - not hardware.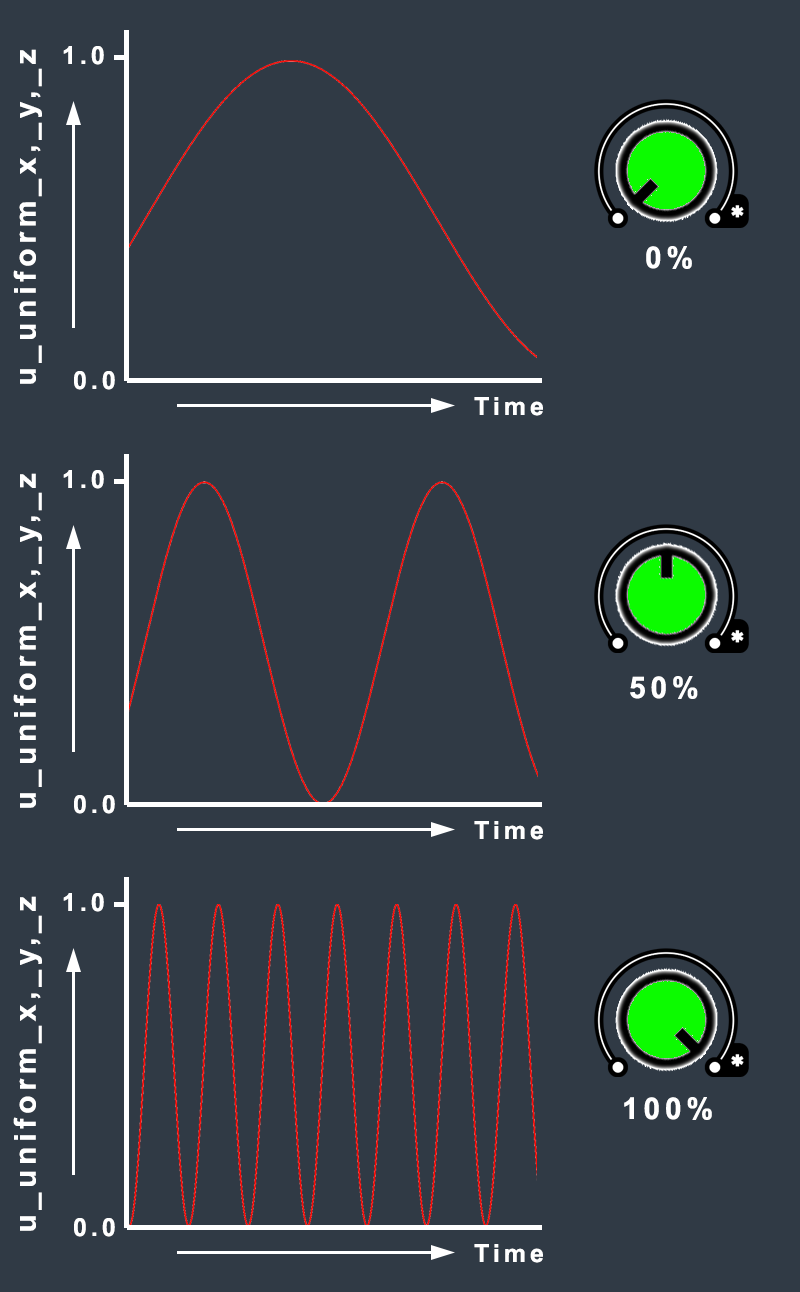
- Mode 7: Control Voltage
In this mode, the three voltage inputs "IN X", "IN Y" and "IN Z" determine the value of the related uniforms "u_slimshader_x", "u_slimshader_y" and "u_slimshader_z". In 5V mode, an input voltage ranging between 0 Volt and 5 Volt is converted to a uniform value of between 0.0 and 1.0. Equally, in 1V mode, an input voltage ranging between 0 Volt and 1 Volt is converted to a uniform value of between 0.0 and 1.0. Note that in both voltage modes the design's electronic protection can handle up to 10 Volt in the three inputs.
Using the Module
The directories shown in the Switch Mode section all have shader files - some more than others. The Slimshader module, therefore, can be used as is. If, however, you want to add, delete and/or modify (your own) shaders, then the following sections are worth reading.
Logon
You can logon to the Slimshader by either connecting a USB keyboard or via WIFI (Raspberry PI Zero W / 2 W). This section describes how to setup the Slimshader for remote logon (WIFI).
- Connect a monitor (Analog or HDMI)
- Connect a USB keyboard
- Put the Slimshader in Mode 1
- Power on the monitor and the Slimshader
- When you see "SLIMSHADER is about to start...", quickly press CTRL+C
Put the Slimshader briefly in Mode B and back in Mode 1 again if you don't see anything happening on screen. - At the prompt enter sudo raspi-config
- Select System Options
- Select Wireless LAN
- Enter the SSID - i.e. the name of your wireless network & OK
- Enter the password to gain access to your wireless network & OK
- Select Finish
- At the prompt enter sudo reboot now
- You can disconnect the USB keyboard now - and put it away
- Wait for the Slimshader module to fully boot and select Mode A
- Make a note of the IP address in the "Hostname Details" section
- Make a note of the Username and Password in the "Login" section
- Put the Slimshader in Mode 1
- Lauch your favourite SSH client and use IP Address, Username and Password to initiate a SSH session to the Slimshader module
- On login, the message "SLIMSHADER is about to start..." will flash by; quickly press CTRL+C
- You now have remote connectivity. Ready for the next section.
Now every time you power-up the Slimshader module, in Mode 1 to 7, you can remote login following steps 18 & 19.
Navigating Slimshader
Now that we have remote connectivity, let's have a look at the directories holding images and shaders.
Before we do though, let's make sure that there are no Slimshader processes are running:
- At the prompt enter top
Wait a few seconds and see if you can spot any of the following processes:
slimshader.py
glslViewer
fim
Example below: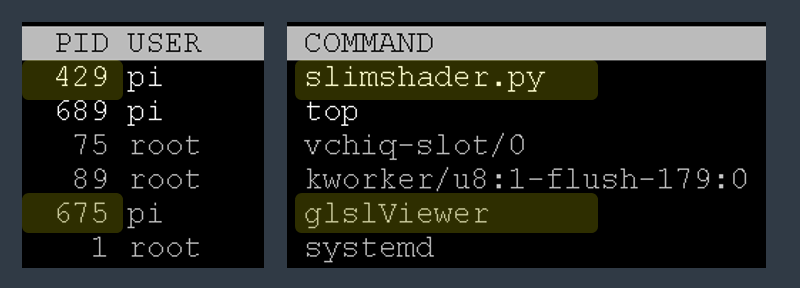
- Make a note of the process IDs (429 and 675 in the example above)
- Press CTRL+C
- Enter sudo kill <process id>
For example: sudo kill 429 - Do the same for the other processes found
Ok, great, all Slimshader related processes are shutdown. We can now launch shaders from the prompt and make modifications.
Enter cd slimshader to go to the Slimshader home directory
The home directory contains the main Slimshader Python script; this file is called slimshader.py. The workings of the script is not part of the scope of this page.
Enter cd images to go to the images directory. In Mode 1, The Slimshader module displays images from this directory.
Enter fim 2_TestScreen.jpg to see the Slimshader's test screen image:
Press CTRL+C to exit the image viewer (called fim)
You can view any of the other images in this directory. Just enter ls -l to see what other .jpg files there are.
Now, let's look at some shader files.
Enter cd .. to go back to the Slimshader home directory.
Enter cd shaders to go to the root directory of all available shaders files.
Enter cd justshaders to go to the directory used in Mode 2.
Enter ls -l to see a list of all .frag shader files stored in this directory.
To see a shader in action, enter glslViewer frag_386.frag
Press CTRL+C to exit the shader viewer (called glslViewer).
Try the same glslViewer command again but for other .frag files. Pick a few at random.
You can now navigate the other directories shown in the Mode Switch section and try out those .frag shaders as well. Have a look at the shaders in the CustX, CustY and CustZ directories for example.
Adding a new shader for manual modulation (Mode 5)
This section runs you through the steps of copying and modifying a shader file for use in Manual Mode (Mode 5).
The example shader-code below comes from www.glslsandbox.com; it's a great source for browsing shaders.
Notice the three lines that start with "uniform"? - you'll see these uniforms re-appear all the time. We'll need to rename these to make it work with glslViewer; and we'll be adding our own slimshader uniforms (u_slimshader_x, ..._y and ..._z). Follow the steps!
#ifdef GL_ES
precision highp float;
#endif

#extension GL_OES_standard_derivatives : enable

uniform float time;
uniform vec2 mouse;
uniform vec2 resolution;

float dist(vec2 a, vec2 b){
  return sqrt(pow(a.x-b.x,2.) + pow(a.y-b.y,2.));
}

void main( void ) {

  vec2 uv = vec2(gl_FragCoord.x/resolution.x*1.9, gl_FragCoord.y/resolution.y);
  float s = 20.;
  float c = fract(time+sin(cos(uv.y*s)*sin(uv.x*s)));
  float d = sin(dist(uv,vec2(mouse.x*1.9,mouse.y))*20.);

  vec4 outC = vec4(c-d,c-d,c-d,1.);

  gl_FragColor = outC;

}
- Navigate to the Manual directory
( cd /home/pi/slimshader/shaders/manual ) - Create a new shader file by entering sudo nano myshader.frag
- Copy/Paste the above example shader-code into the new myshader.frag file
- Press CTRL+S to save the file
- Now we need to rename the uniform names; Press ALT-R
- Type: time & press enter
- Type: u_time & press enter
- "Replace this instance?" - Select "A" (All)
- Again, press ALT-R
- Type: mouse & press enter
- Type: u_mouse & press enter
- "Replace this instance?" - Select "A" (All)
- Again, press ALT-R
- Type: resolution & press enter
- Type: u_resolution & press enter
- "Replace this instance?" - Select "A" (All)
- Now, add the Slimshader uniforms. Add the following three lines to the shader file. Put them underneath the existing uniforms is a good spot:
uniform float u_slimshader_x;
uniform float u_slimshader_y;
uniform float u_slimshader_z; - Press CTRL+S to save the file
- Press CTRL+X to exit the nano editor
- Let's see if the shader works; enter glslViewer myshader.frag
If all went well, you should see the shader below.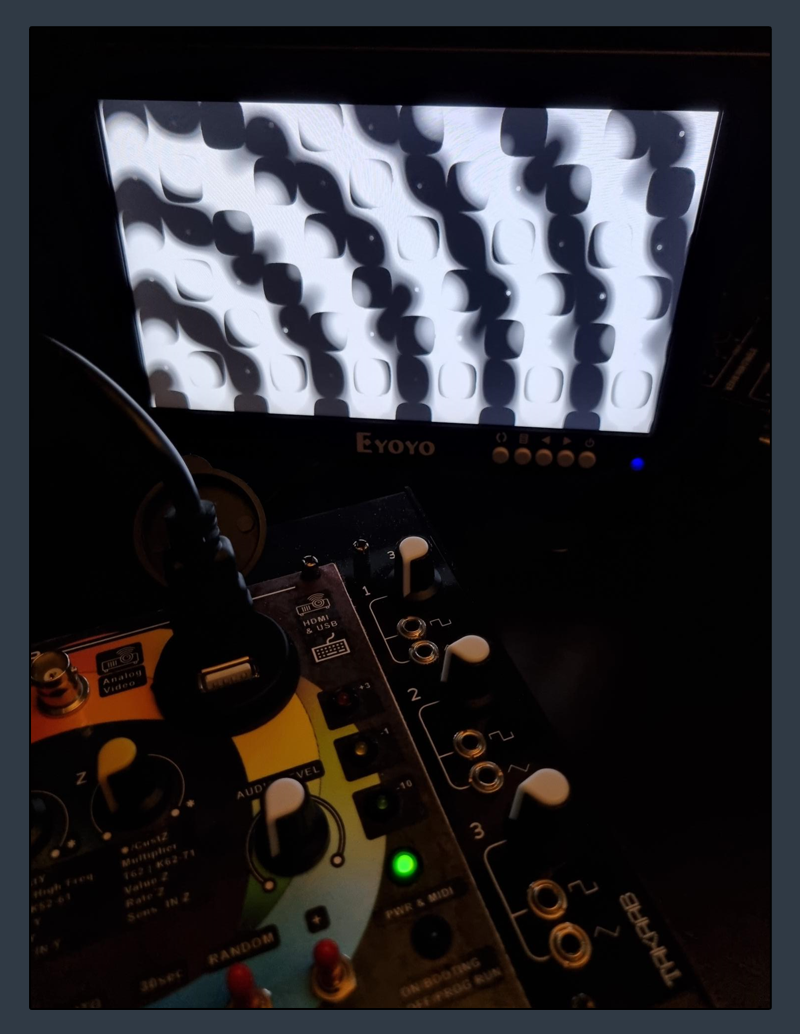
Leave the shader running. In this next part we will finally make the shader respond to the three dials X, Y and Z.
- Launch another SSH session (follow steps 18 & 19 in the Logon section).
- Again, go to the Manual directory
( cd /home/pi/slimshader/shaders/manual ) - Enter sudo nano myshader.frag
Now we have to look for parts in the code where we can add the three uniforms. This process is of an experimental nature - trial and error basically ... and it can be a lot of fun!
The following steps are just an example of what is possible. The more you understand shaders, the more targeted your approach will be.
First we'll explore what happens to the visuals still running on screen when we make a change to the code.
- Look for the line: float s = 10.;
- Change it to: float s = 50.;
- Press CTRL+S
...that's pretty cool huh? You just changed the appearance of the shader by only making a small change! - Enter some other value ranging from 1. to 250. (any value really) and press CTRL+S each time you make a change.
Don't forget to always use the "." like 1. or 2.5 or 250.0
It looks like this could be a great spot to put the first uniform (u_slimshader_x) - Change the line to: float s = 1.0 + (u_slimshader_x * 49.0);
Now we can use the X dial to change the value for "s" from 1. to 50. How?
Imagine the dial at minimum. This means u_slimshader_x = 0. therefore;
s = 1.0 + (0. * 49.0) = 1.
Imagine the dial in the middle. This means u_slimshader_x = 0.5 therefore;
s = 1.0 + (0.5 * 49.0) = 25.5
Imagine the dial at maximum. This means u_slimshader_x = 1.0 therefore;
s = 1.0 + (1.0 * 49.0) = 50.
Let's see it for yourself! - Press CTRL+X to leave the editor
- Put the Slimshader Module in Mode 5
- Make sure the module is in "Manual" Mode (toggle switch)
- Enter sudo reboot now
- Wait for a full reboot
- When you see the text "SLIMSHADER" press the +/- toggle switch to - to see the shader we just edited (if not, keep on pressing until it shows)
- Turn the X dial and witness the magic (see below)
The Y and Z dials won't do anything yet - that's discussed next.
Now, logon to the Raspberryo once more and find a spot for u_slimshader_y and u_slimshader_z
... or just create a new shader file and copy/paste the code below.
Before you do all this, you may want to kill and Slimshader processes - see section Navigating Slimshader. PS: as you become more familiar with the workings of the Raspbian Operating System, you'll find various other -better & faster- ways of modifying shaders. This manual sets out to be consistent in doing things - in perhaps not always the most efficient way.
#ifdef GL_ES
precision highp float;
#endif

#extension GL_OES_standard_derivatives : enable

uniform float u_time;
uniform vec2 u_mouse;
uniform vec2 u_resolution;

uniform float u_slimshader_x;
uniform float u_slimshader_y;
uniform float u_slimshader_z;

float dist(vec2 a, vec2 b){
  return sqrt(pow(a.x-b.x,2.) + pow(a.y-b.y,2.));
}

void main( void ) {

  vec2 uv = vec2(gl_FragCoord.x/u_resolution.x*1.9, gl_FragCoord.y/u_resolution.y);
  float s = 1.0 + (u_slimshader_x * 49.0);
  float c = fract(u_time+sin(cos(uv.y*s)*sin(uv.x*s))) + u_slimshader_z * 1.25;
  float d = sin(dist(uv,vec2(u_mouse.x*1.9,u_mouse.y)) * (0.25 + (u_slimshader_y * 100.)));

  vec4 outC = vec4(c-d,c-d,c-d,1.);

  gl_FragColor = outC;

}
- Press CTRL+S to save the changes
- Press CTRL+X to leave the editor
- Make sure the Slimshader Module is in Mode 5
- Make sure the module is in "Manual" Mode (toggle switch)
- Enter sudo reboot now
- Wait for a full reboot
- When you see the text "SLIMSHADER" press the +/- toggle switch to - to see the shader; or keep on pressing until it shows
- Turn the X, Y and Z dials to witness the latest magic (see below)
Wrapping it up
The process of adding and modifying shaders is the same for the other modes. In fact, you can move a shader from the "manual" directory to "lfo" directory, for example, and it will work there as well.
The one thing you have to keep in mind is that the shaders in the "audio" directory use u_slimshader_x and u_slimshader_y only; so, if you coded u_slimshader_z into your shader, then that part of the shader won't be modulated by the incoming audio.
MIDI Jumper Settings
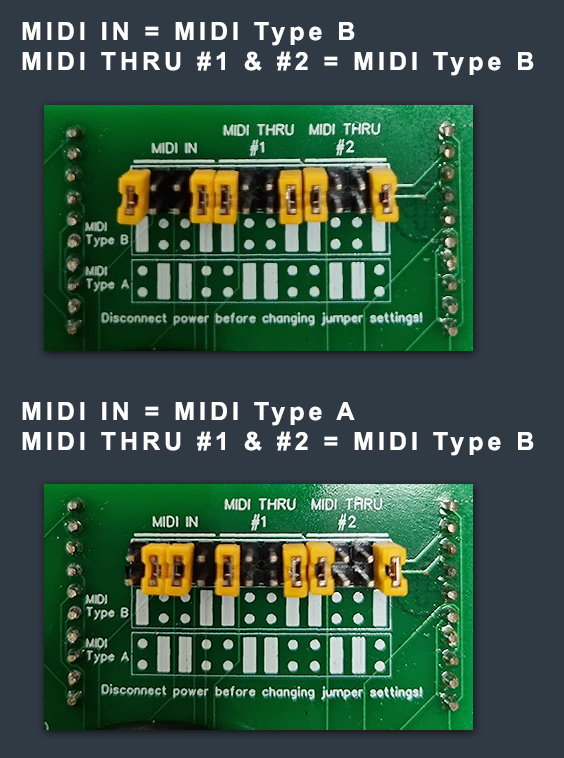
The Slimshader module has one MIDI IN and two MIDI THRUs. Each MIDI socket can be set to operate as MIDI Type A or MIDI Type B.
Below are two examples. Simply copy the PCB's printed diagram to switch between MIDI Type A or B. MIDI Types A and B are functionally identical; it's just that source/sink (i.e. Tip/Ring) are reversed. Please don't try any other combination as this may result in damaging your MIDI connection.
Quick User Guide
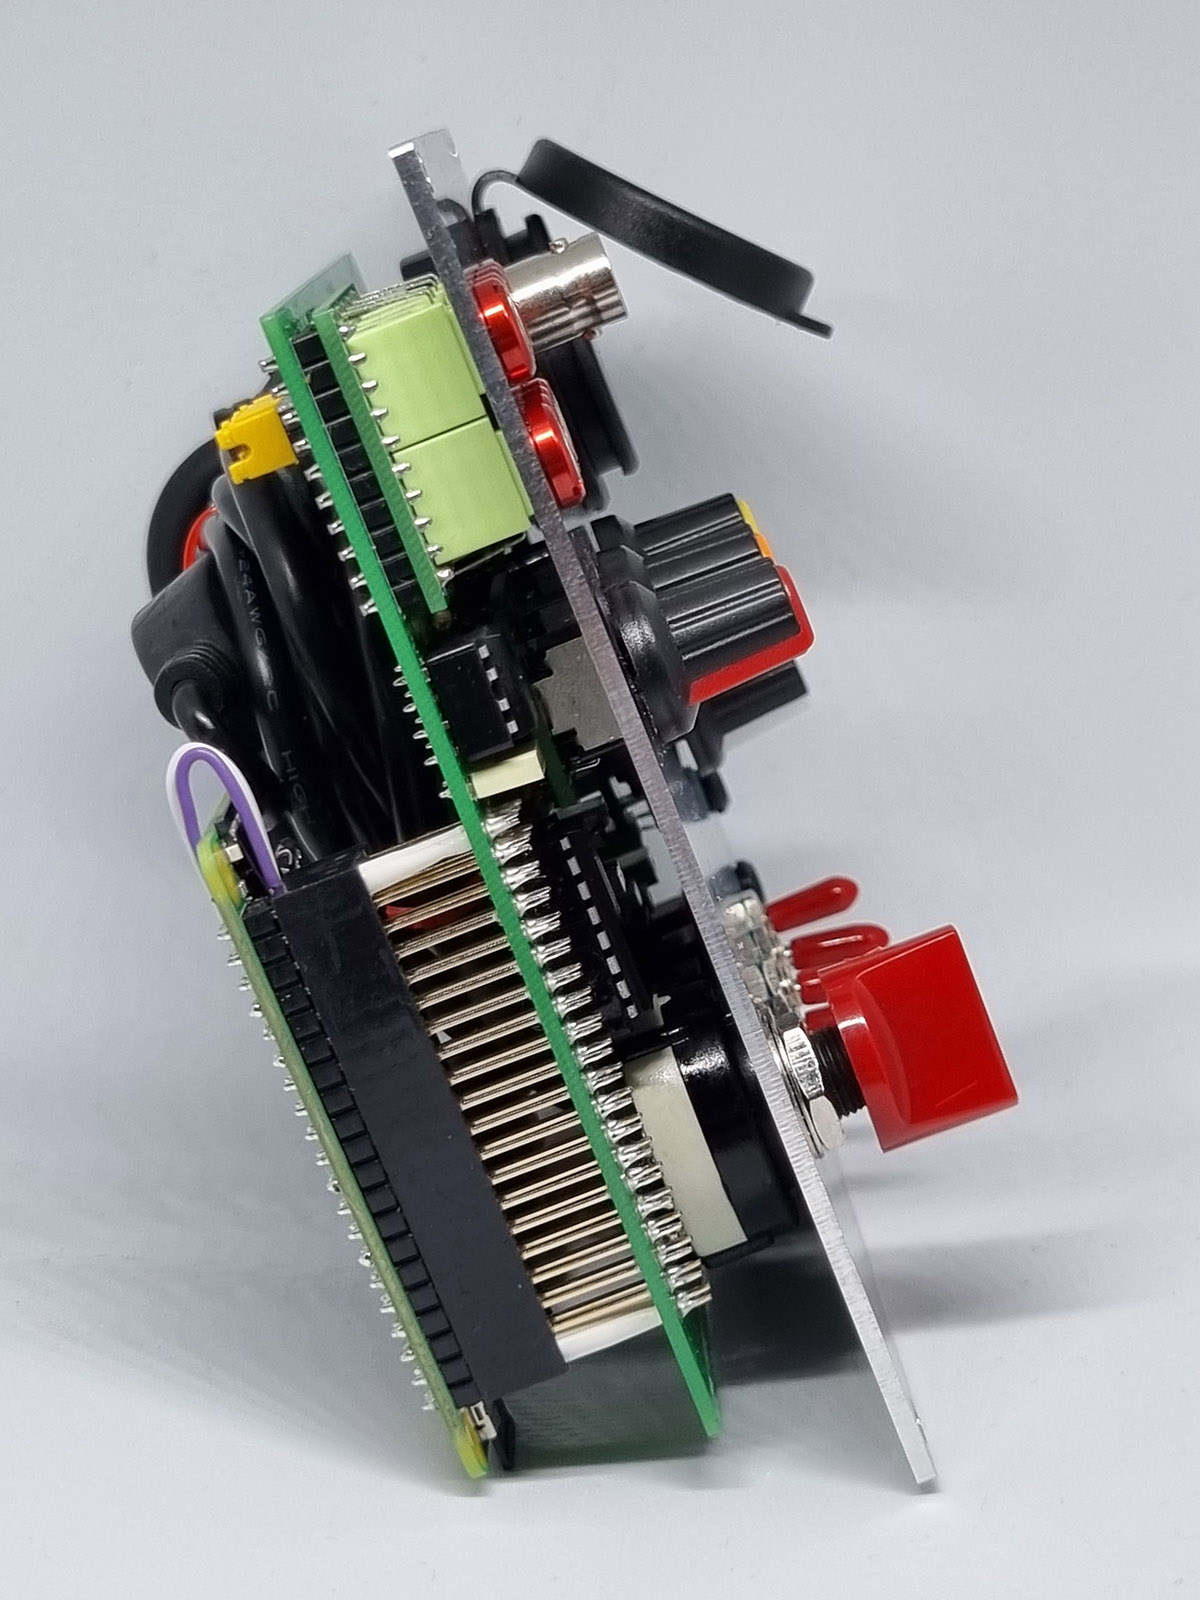
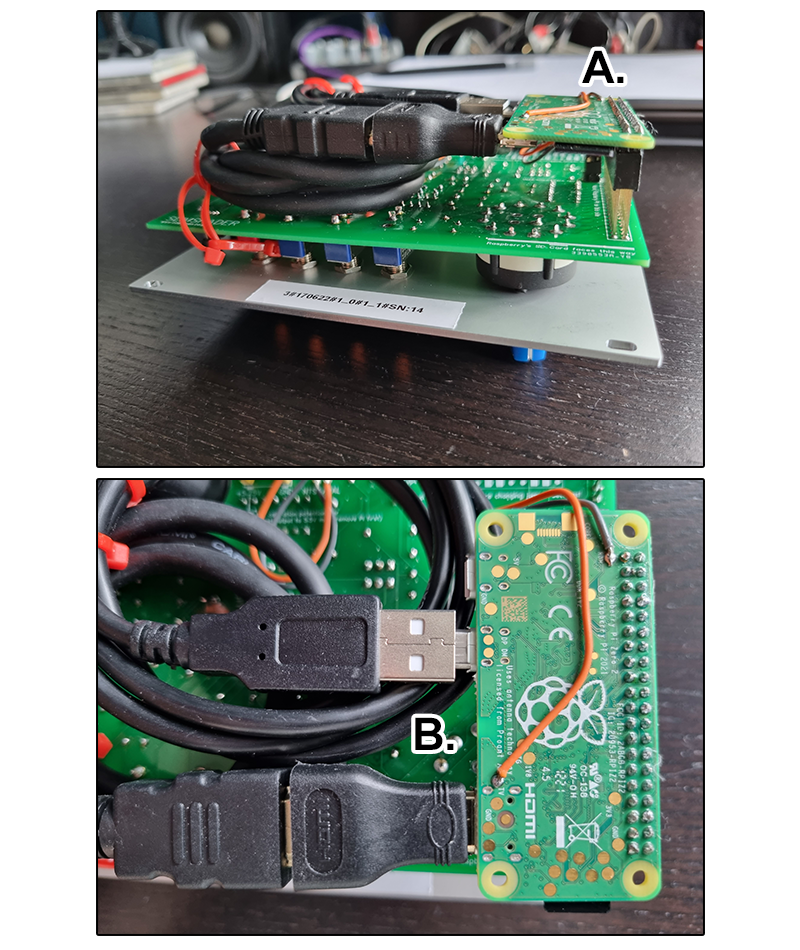
As with any Eurorack module, it's wise to do a quick visual check on arrival. See below.
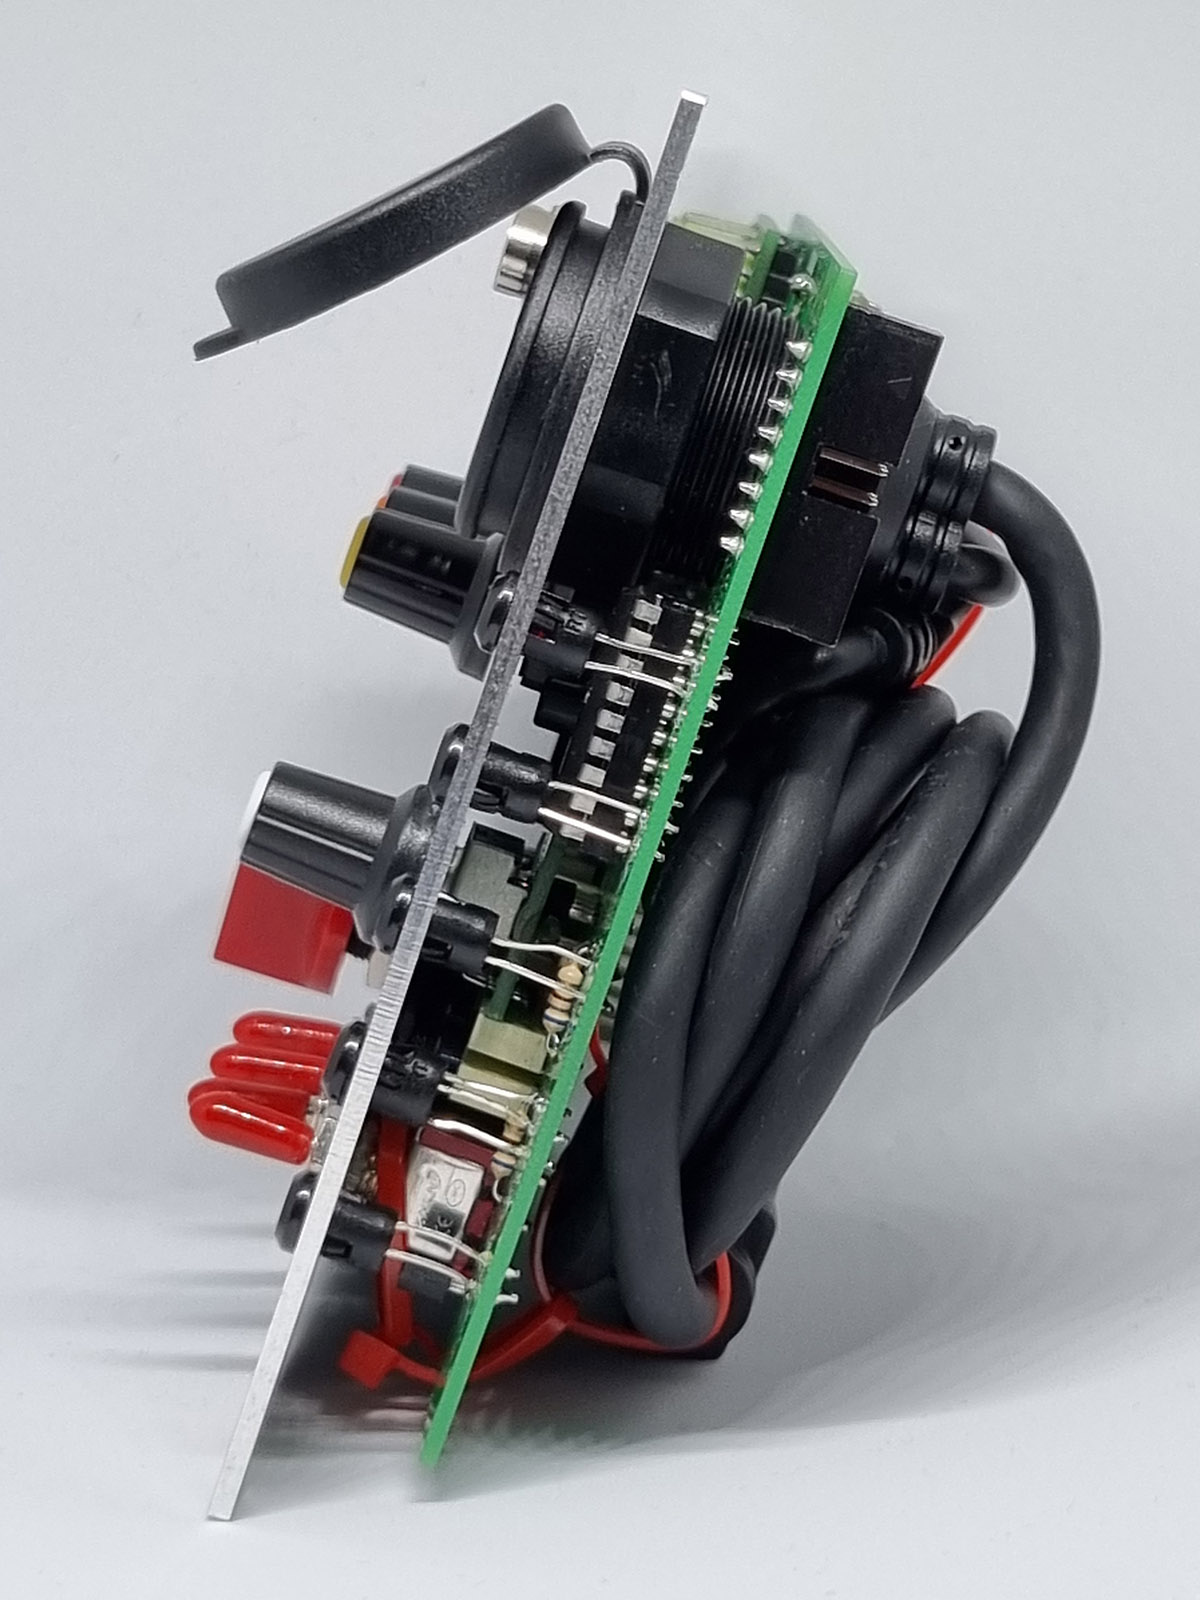
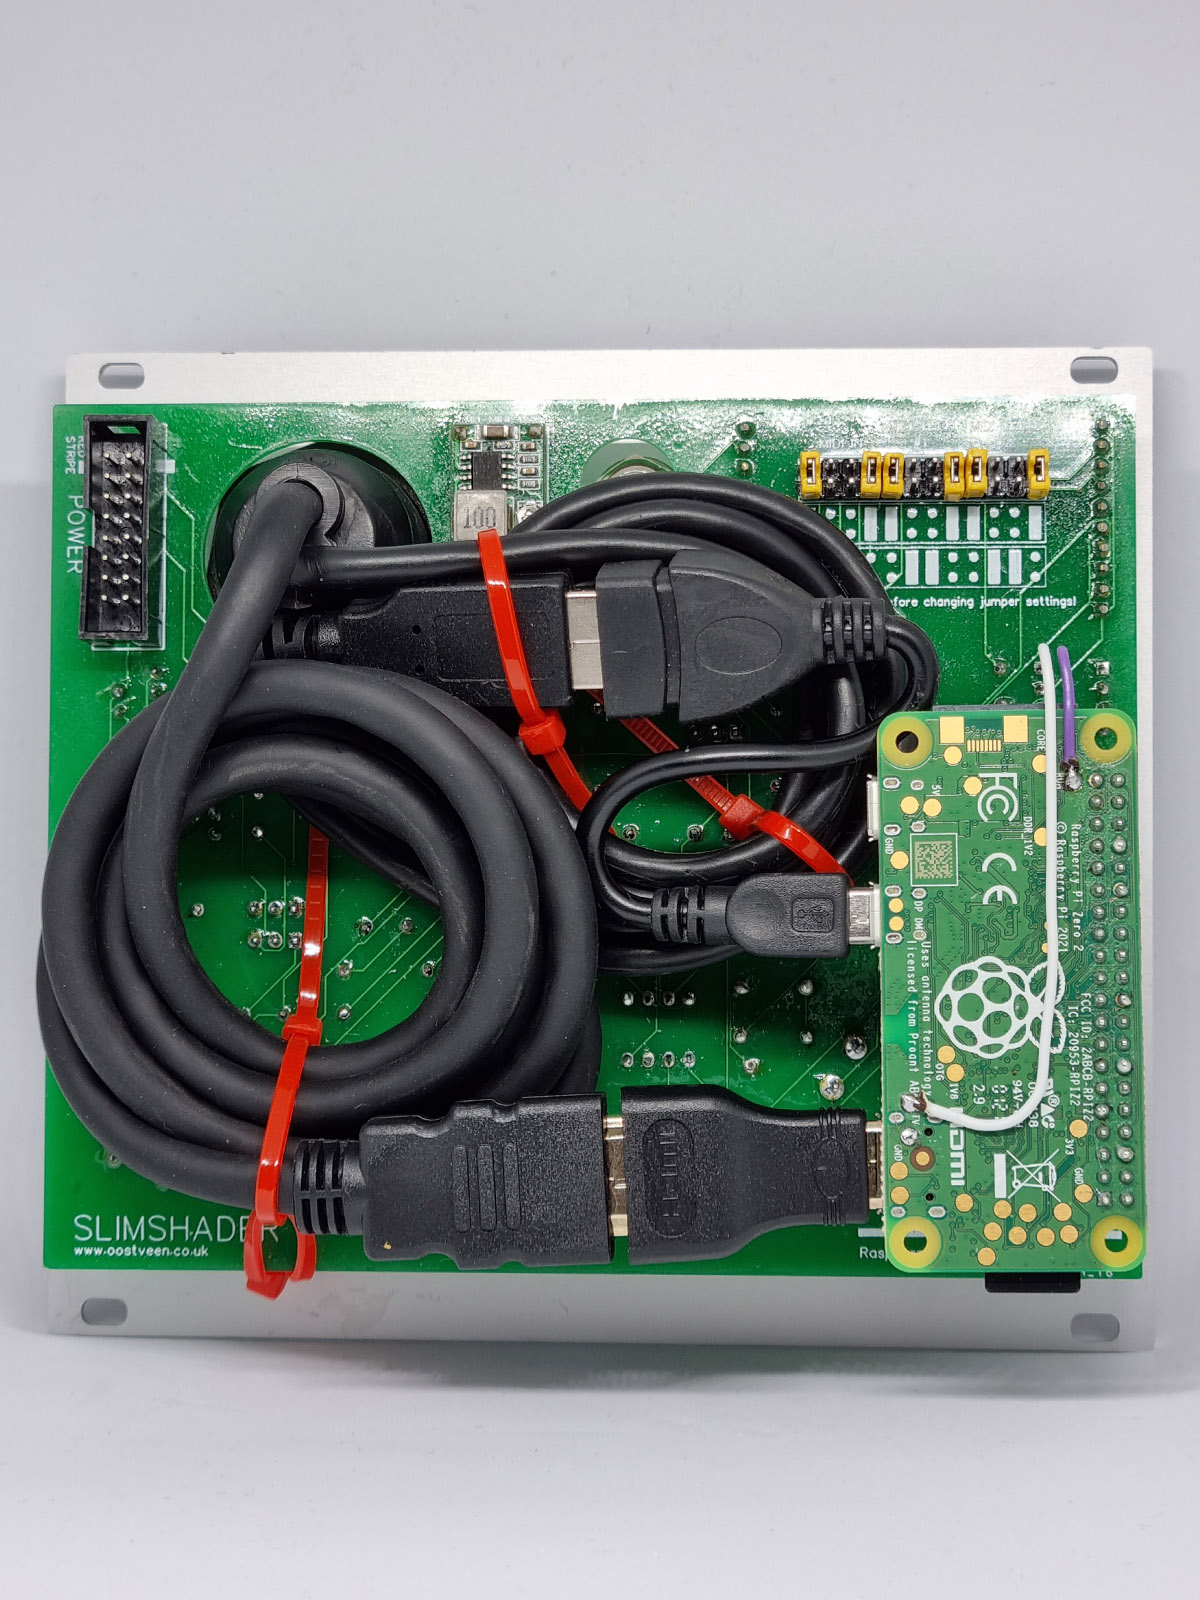
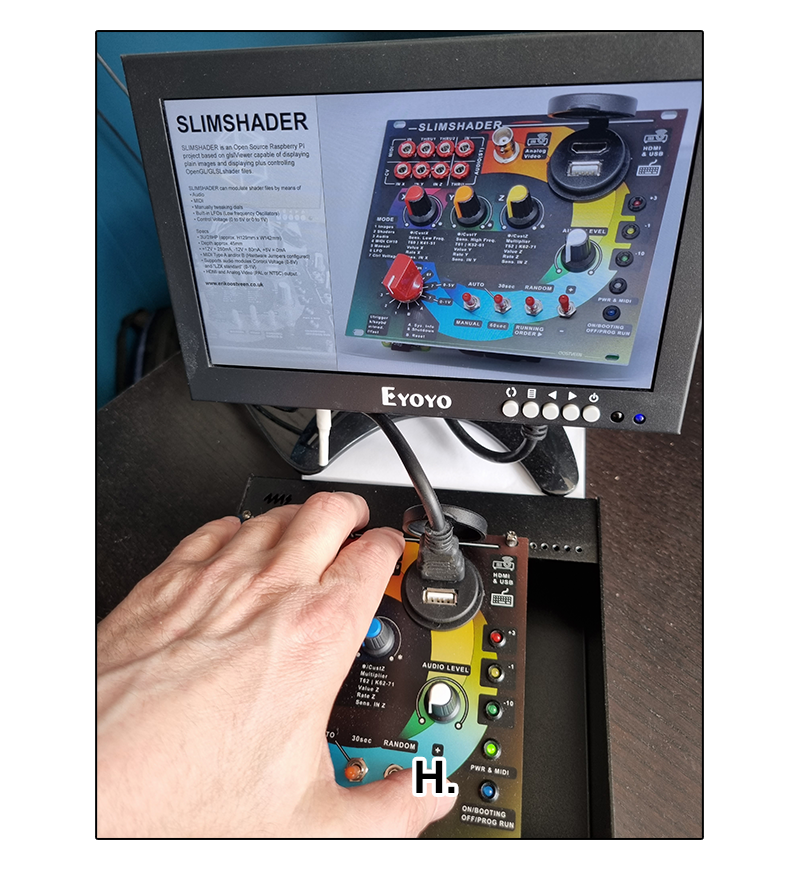
A. Ensure that the Raspberry PI board is fully inserted and at a 90 degrees angle with its socket.
B. Ensure that both the USB- and HDMI- plugs are firmly connected (in a straight line).
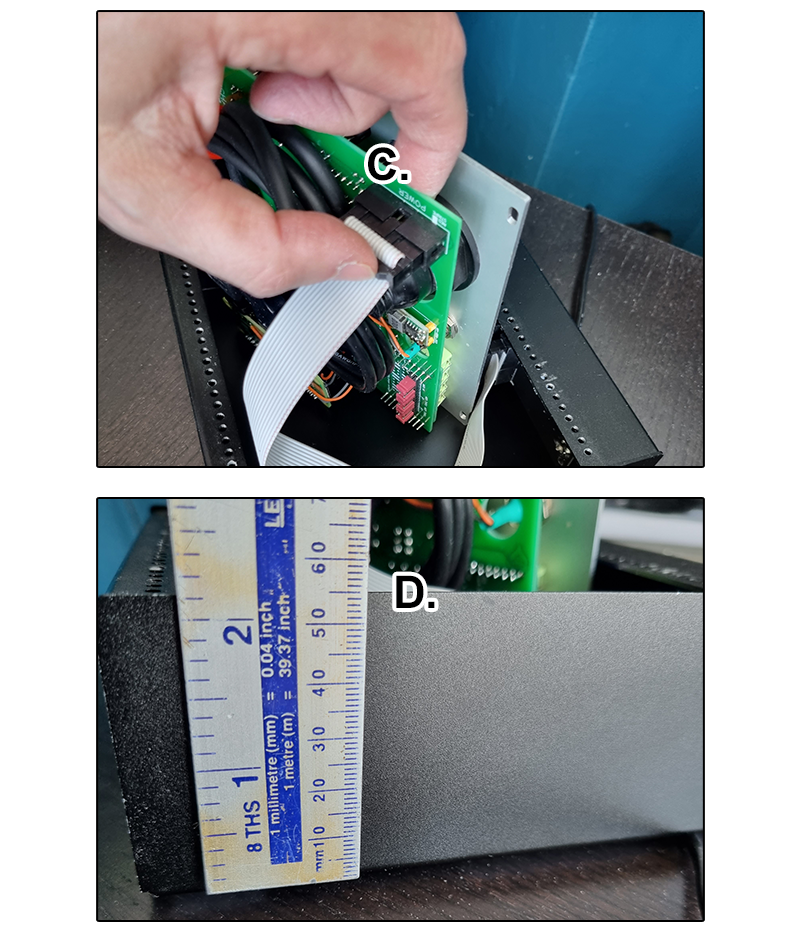
C. Ensure that the enclosure (Eurorack case or desktop enclosure) is NOT powered on. Plug in the power flat-cable. Always support the printed circuit board (PCB) with your fingers when pressing down the 16 pin header socket do avoid accidentally bending/breaking the PCB.
D. Mount the module in place. Ensure that the enclosure has a depth of 50mm to 55mm (about 2+ inches).
Set all toggle switches, dails and rotary switch as shown below. The momentary toggle flick +/- switch remains in the center position when released. Select MODE 1 on the rotary switch.
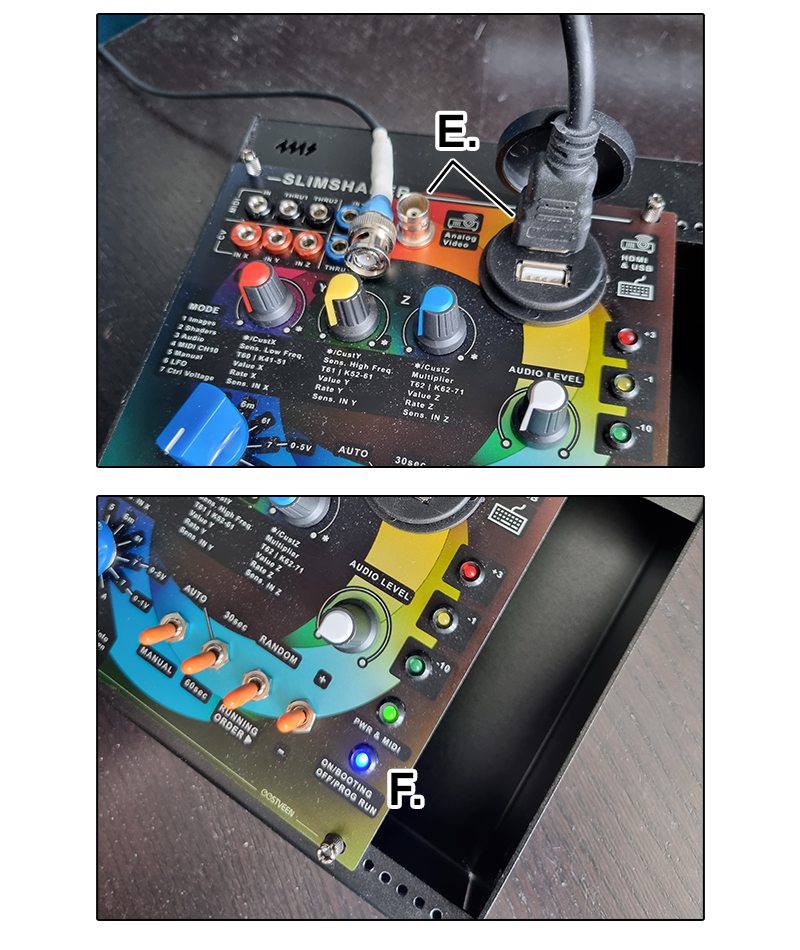
E. It's time to connect up a monitor. You can use the Analog Video BNC out or the HDMI socket. We are using HDMI in this quick user guide.
F. Switch on the power. The "ON/Booting", "OFF/PROG RUN" Blue LED should light up. When the LED turns off, the main Slimshader program has succesfully started.
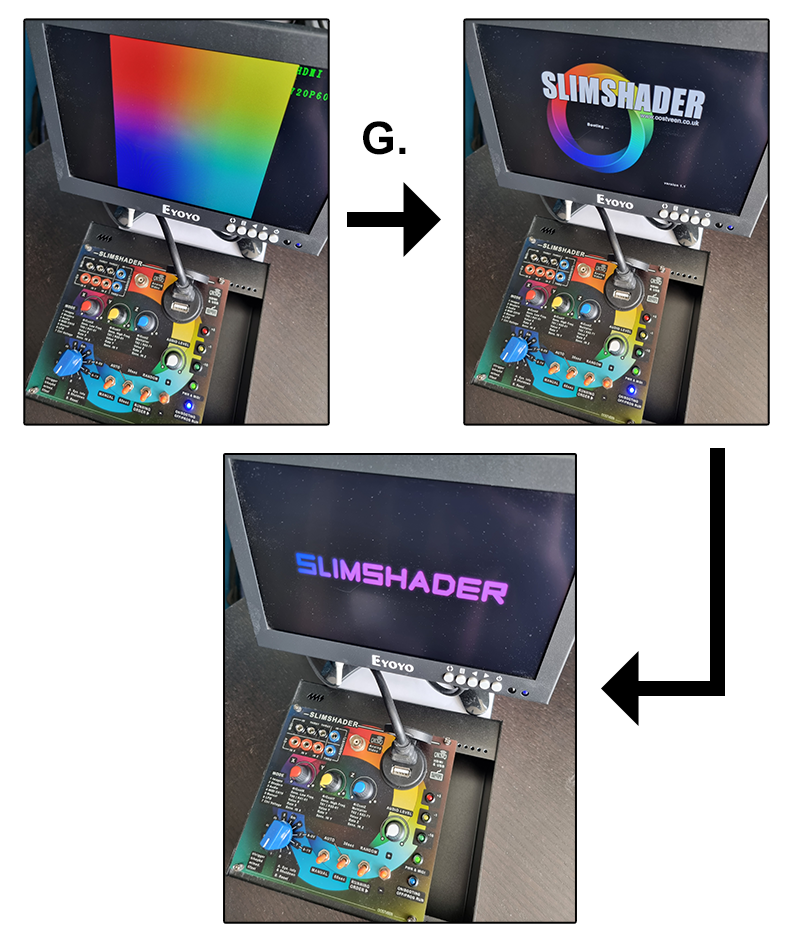
G. During the boot up you should see the standard Raspberry rainbow screen after which you should see the Slimshader splash screen - and finally the text "Slimshader", which is in fact a shader file.
H. Use the +/- switch to browse through the default images. You can upload your own jpegs. In the "Mode Switch" section you can find more info as to where the .jpg images are stored.
Switch to MODE 2. In this mode, the module has access to over 500 shaders located in the "justshaders" directory. You can run through these manually with the +/- switch or if you set the 1st switch to "auto", switching will take place automatically every 30 or 60 seconds depending on the setting of the 2nd switch. The 3rd switch allows for running in "running mode", which means in alphabetical order or "random"; in this setting, the module selects a random shader file everytime you select + or - (so you can't go back an forth between the same random shaders but instead it's a different shader at every switch). The +/- switch always works regardless of the setting of the "auto/manual" switch.
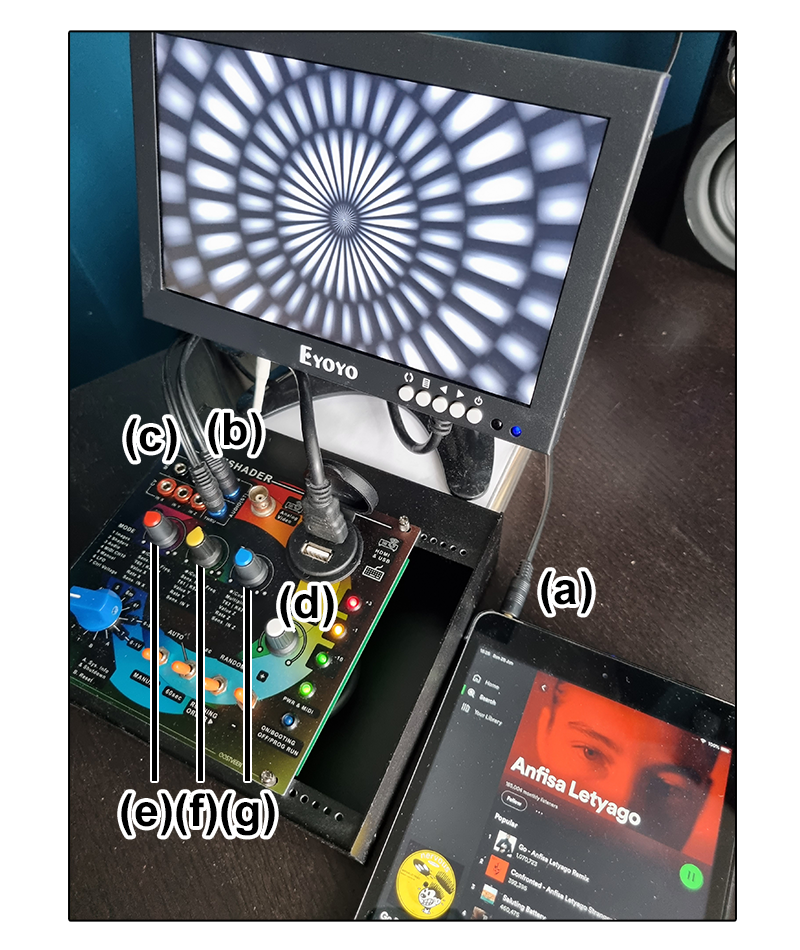
Switch to MODE 3. In this mode, shaders will react to incoming audio. See below; (a) connect the line- or headphones output of a stereo device to (b) the audio input of the Slimshader module. (c) connect the stereo output, which is simply the same audio signal that goes into the module, to an amplifier or mixing console. Set dail (d) as such that the three LEDs (Green, Amber and Red) light up with Red flashing occasionally when the audio peaks. Essentially here we are aiming for a nice incoming audio level (not too low and not constantly too high). Dail (e) sets the sensitivity to bass sounds and dail (f) sets the sensitivity to high pichted sounds. Dail (g) boosts the module's internal X- and Y- values coming from dails (e) and (f) - this way you can get some extreme -over the top- looking visuals.
Switch to MODE 4t. In this mode, shaders will react to incoming MIDI (on MIDI channel 10). The "t" in 4t means Trigger. Connect the MIDI out of a keyboard, DAW or drum machine to MIDI in of the Slimshader module.
See video below (no sound); only three notes are used in Trigger mode: C, C# & D (MIDI Note Numbers 60, 61 and 62). C triggers the module's internal X value. C# the Y value and D the Z value. How fast each value drops for 1.0 to 0.0 depends on the setting of the X, Y and Z dails (0% = Fast, 100%, = slow). Look for the subsection "Mode 4t & Mode 4k (MIDI CH10)" to read more about trigger mode.